转载: 原文地址
Block 内调用 super 引发的循环引用 TLDR
介绍了两种较为少见的 Block 循环引用,并提供了解决方法。
宏的替换在 Preprocessed 阶段,super 的变更在 compile 阶段,因此对 self 进行 weak/strong dance 并解决不了 super 导致的循环引用问题。
同时通过 RewriteObjc 与 Disassembly 的方法从底层原理上分析了 super 与 Block 调用的本质,辅以内存实际情况与示意图方便加深理解。穿插了 objc_msgSend Stub 相关的知识。
验证了在 Block 中调用 super 时,RewriteObjc 生成代码的一个 bug 。
问题抛出 问题都来自真实案例改编。Demo
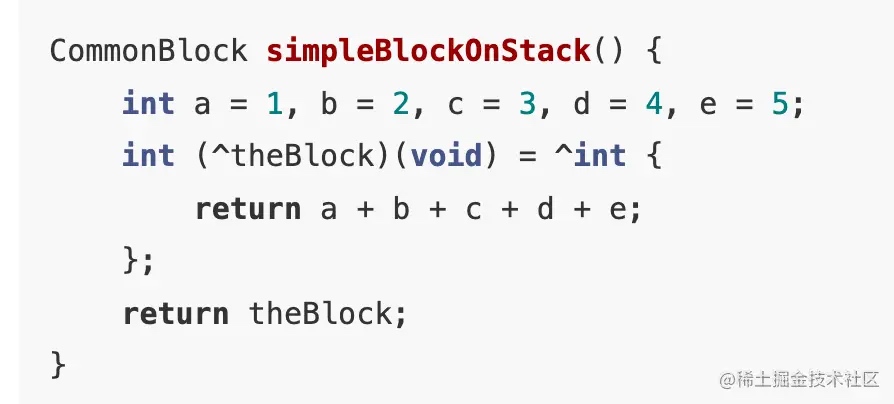
1
2
3
4
5
6
7
8
9
10
11
12
13
14
15
16
17
18
19
20
21
@interface TestObj : NSObject @property (nonatomic, copy) void(^captureSelf)(void); @property (nonatomic, assign) BOOL capture; @end @implementation TestObj - (instancetype)init { if (self = [super init]) { // Q1:这样会不会泄漏 self.captureSelf = ^() { _capture = YES; }; } return self; } @end
1
2
3
4
5
6
7
8
9
10
11
12
13
14
15
16
17
18
19
20
@interface TestChildObj : TestObj @end @implementation TestChildObj - (instancetype)init { if (self = [super init]) { @weakify(self); // Q2:这样会不会导致泄漏? self.captureSelf = ^() { @strongify(self); super.capture = YES; }; } return self; } @end
代码其实非常简单,一共是两个问题,分别是否会循环引用。
前置知识 环境 Xcode 14.2 (14C18),M1 Mac。
Block 内存布局 想看懂这个需要一些对 block 汇编的了解,可以可以查看:Block-ABI-Apple 。源码都来自 libclosure 。
1
2
3
4
5
6
7
8
struct Block_layout { void * __ptrauth_objc_isa_pointer isa; // 8 volatile int32_t flags; // contains ref count // 4 int32_t reserved; // 4 BlockInvokeFunction invoke; // 8 struct Block_descriptor_1 *descriptor; // 8 // imported variables };
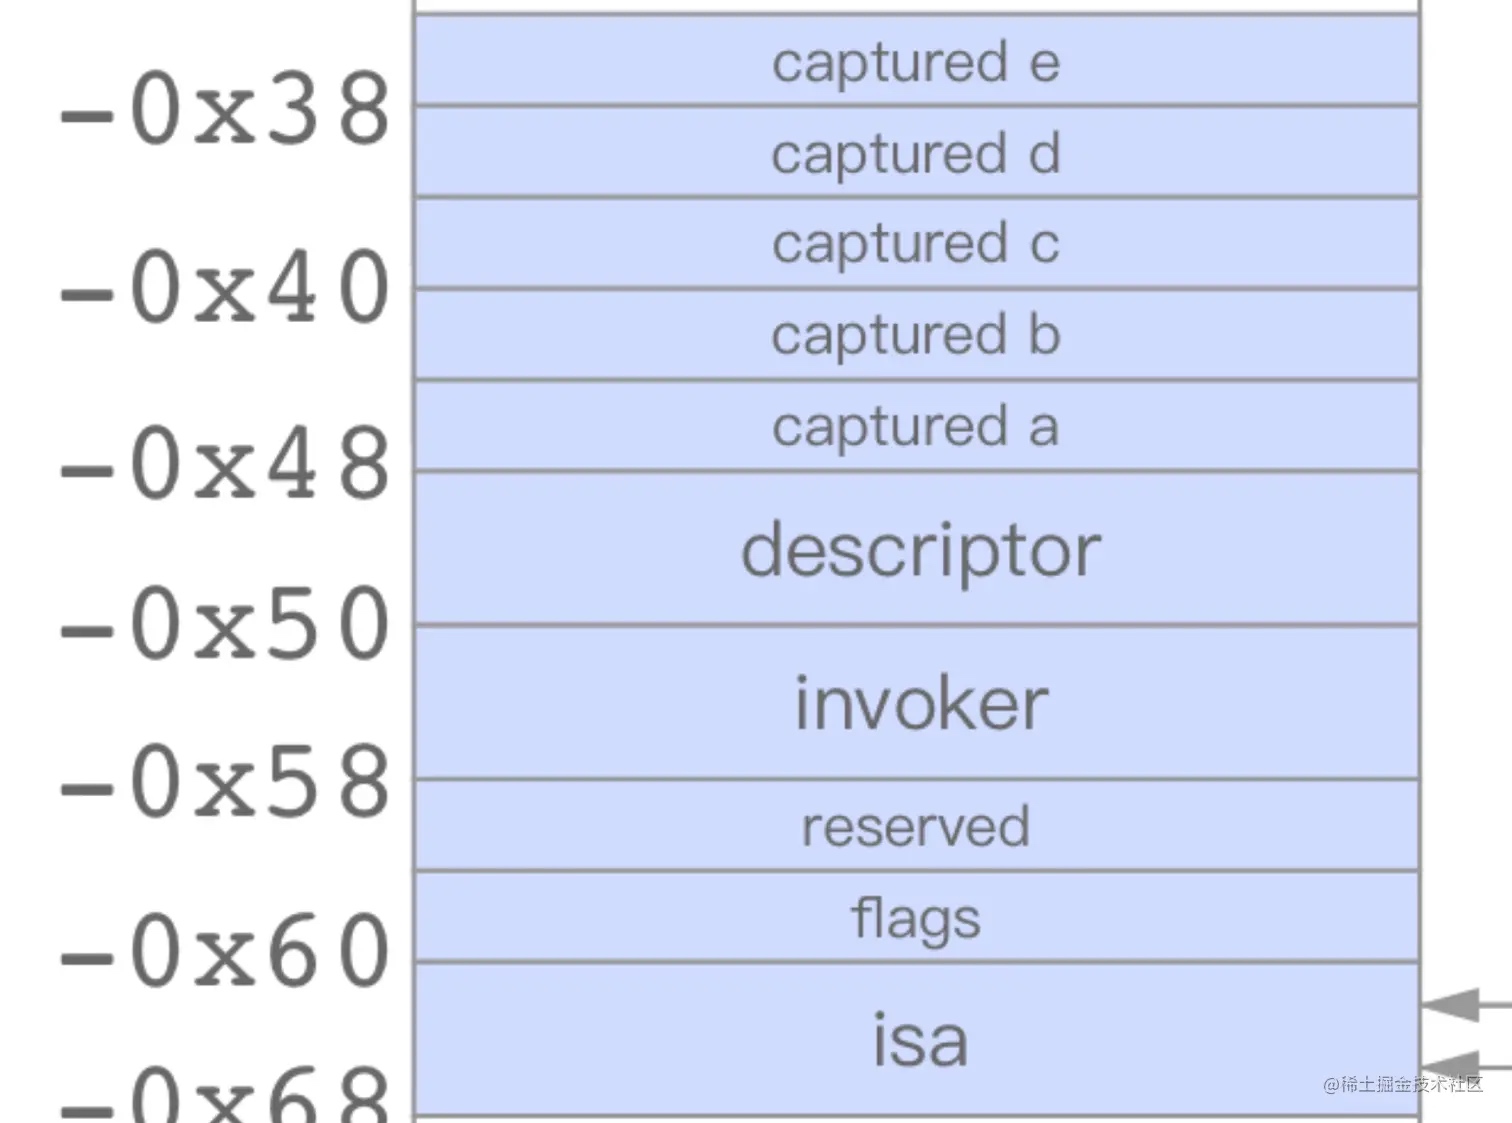
如果一个 Block 长这样,在 栈 上,内存布局类似如此:
1
2
3
4
5
6
7
8
9
10
11
12
13
14
15
16
17
18
19
20
21
22
struct __block_impl { void *isa; int Flags; int Reserved; void *FuncPtr; }; struct __TestChildObj__simpleBlockOnStack_block_impl_0 { struct __block_impl impl; // 8+4+4+8 = 0x18 struct __TestChildObj__simpleBlockOnStack_block_desc_0* Desc; // 0x8 int a; // 4,这个偏移量正好就是 0x20 int b; int c; int d; int e; __TestChildObj__simpleBlockOnStack_block_impl_0(void *fp, struct __TestChildObj__simpleBlockOnStack_block_desc_0 *desc, int _a, int _b, int _c, int _d, int _e, int flags=0) : a(_a), b(_b), c(_c), d(_d), e(_e) { impl.isa = &_NSConcreteStackBlock; impl.Flags = flags; impl.FuncPtr = fp; Desc = desc; } };
这里我们就可以简单得记住,偏移量 + 0x20 就是第一个被 capture 的值。
1
2
3
self.captureSelf = ^() { self.capture = YES; };
以此类推,其实就长这样。
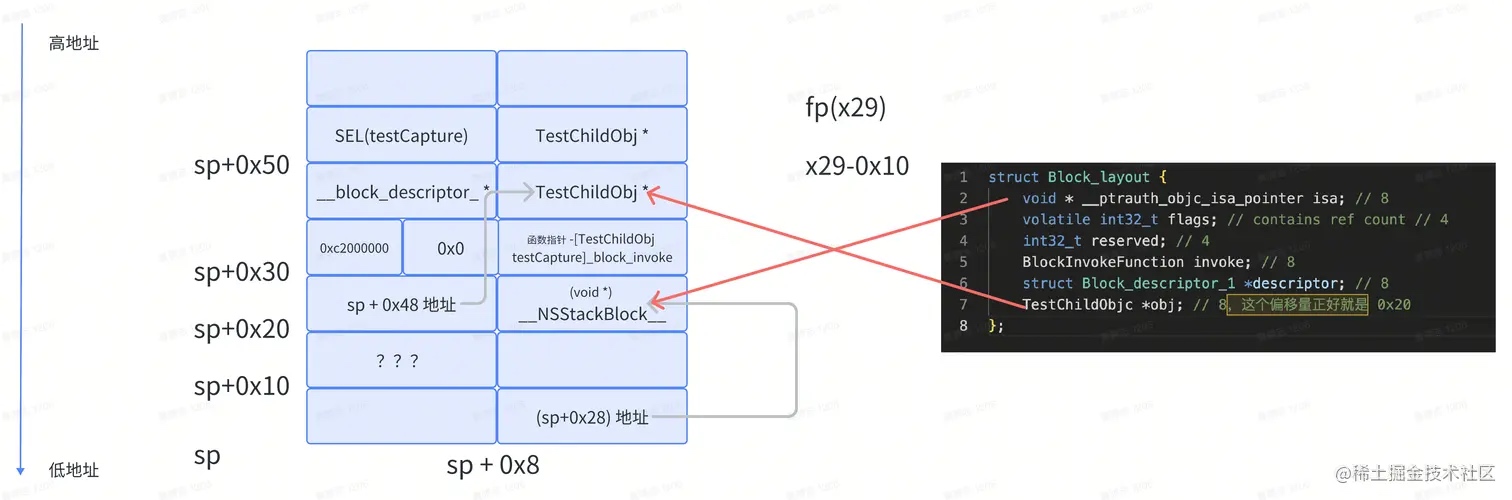
1
2
3
4
5
6
7
8
struct Block_layout { void * __ptrauth_objc_isa_pointer isa; // 8 volatile int32_t flags; // contains ref count // 4 int32_t reserved; // 4 BlockInvokeFunction invoke; // 8 struct Block_descriptor_1 *descriptor; // 8 TestChildObjc *obj; // 8,这个偏移量正好就是 0x20 };
但如果是 capture 了 super 呢?
1
2
3
self.captureSelf = ^() { super.capture = YES; };
在 Rewrite C++ 之后其实就没有捕获了 super(self) 变量了,这个是有疑问的。并且生成的 C++ 代码里是有明显异常的,在函数体中 self 是如何传递进来的?正常的调用是从 __cself 里拿。估计是 Rewrite C++ 有 bug,后文分析汇编的时候会证明其实实际上是有 capture 住 TestChildObjc * 对象的(同时通过偏移量与 block size 两点来证明)。Child.cpp 。
1
2
3
4
5
6
7
8
9
10
11
12
13
14
15
16
17
struct __TestChildObj__testSuperCapture_block_impl_0 { struct __block_impl impl; struct __TestChildObj__testSuperCapture_block_desc_0* Desc; __TestChildObj__testSuperCapture_block_impl_0(void *fp, struct __TestChildObj__testSuperCapture_block_desc_0 *desc, int flags=0) { impl.isa = &_NSConcreteStackBlock; impl.Flags = flags; impl.FuncPtr = fp; Desc = desc; } }; static void __TestChildObj__testSuperCapture_block_func_0(struct __TestChildObj__testSuperCapture_block_impl_0 *__cself) { ((void (*)(__rw_objc_super *, SEL, BOOL))(void *)objc_msgSendSuper)((__rw_objc_super){(id)self, (id)class_getSuperclass(objc_getClass("TestChildObj"))}, sel_registerName("setCapture:"), ((bool)1)); }
objc_msgSendSuper2 还需要对 objc_msgSendSuper2 有一些了解,了解每个传入的参数是什么,才能更好理解汇编。其实传入的 objc_super * 是栈上的地址(因为是 struct),栈上会进行分配并赋值。
1
2
3
4
5
6
7
8
9
10
11
12
13
14
15
16
/// Specifies the superclass of an instance. struct objc_super { /// Specifies an instance of a class. __unsafe_unretained _Nonnull id receiver; /// Specifies the particular superclass of the instance to message. __unsafe_unretained _Nonnull Class super_class; /* super_class is the first class to search */ }; // objc_msgSendSuper2() takes the current search class, not its superclass. OBJC_EXPORT id _Nullable objc_msgSendSuper2(struct objc_super * _Nonnull super, SEL _Nonnull op, ...) OBJC_AVAILABLE(10.6, 2.0, 9.0, 1.0, 2.0);
Q1: 这个有点经验的都知道泄漏了,因为隐式包含调用了 self->_xxx ,还是通过 self 再进行偏移量获取的。这里就不再进行分析了,看完分析 Q2 之后你也可以尝试分析 Q1 的问题。
1
2
3
4
5
6
7
8
@weakify(self); self.captureSelf = ^() { @strongify(self); if (!self) return; self->_capture = YES; // _capture = YES; };
Q2: 其实我一开始认为这是没有问题的,网上也有对 super 的介绍(老八股),我们知道会 super 被替换为 objc_msgSendSuper(self) 。因此在我粗浅的认知中,觉得既然会被换成 self ,那就会被 weak/strong dance 所替换,然后就万事大吉了。
https://developer.apple.com/documentation/objectivec/1456712-objc_msgsend
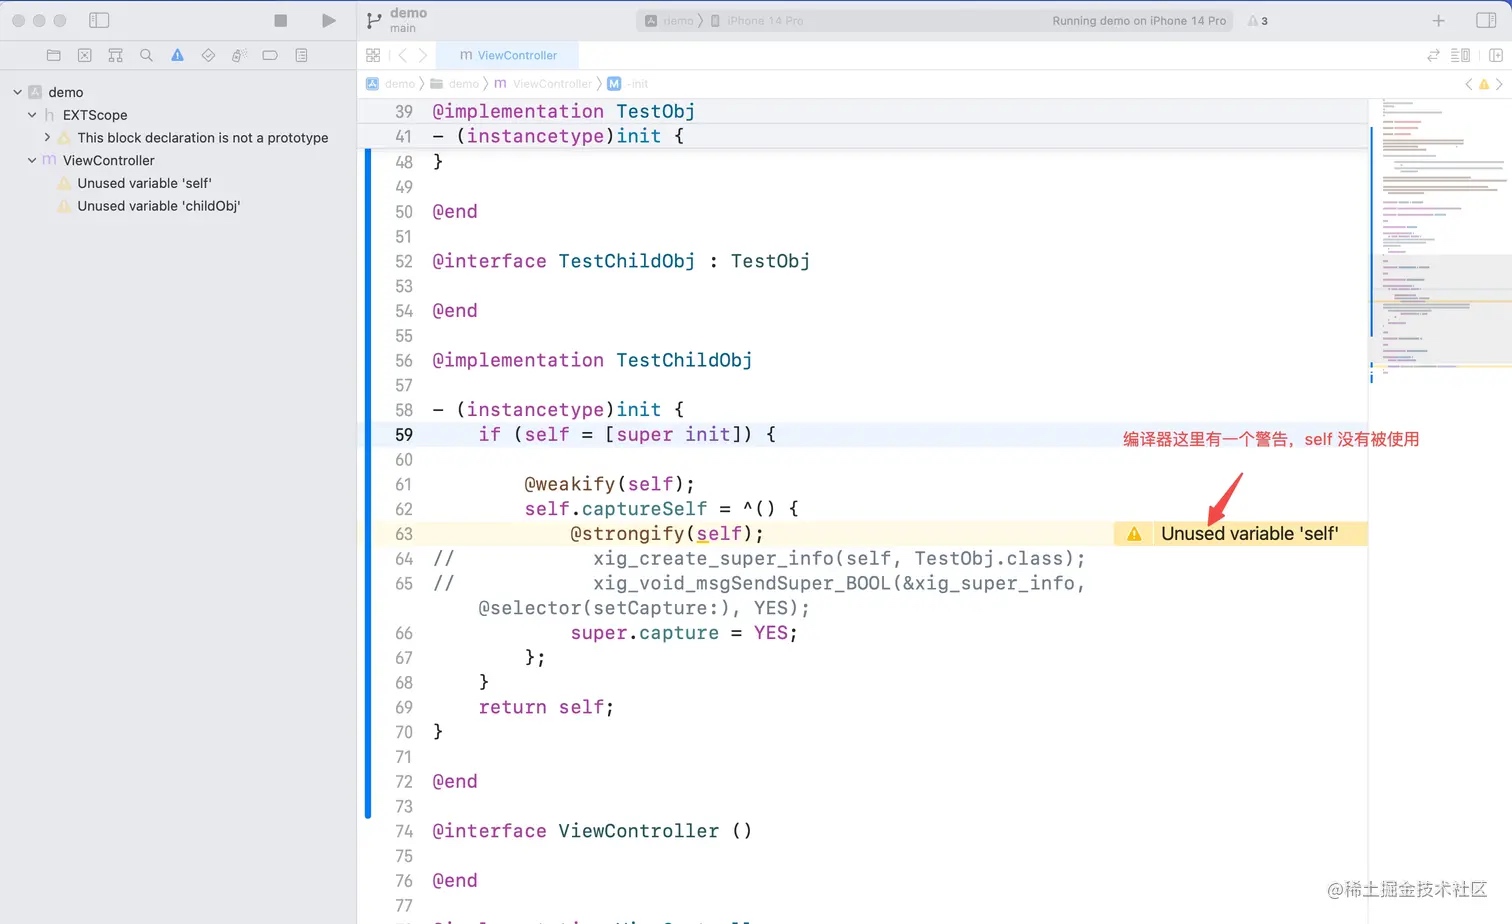
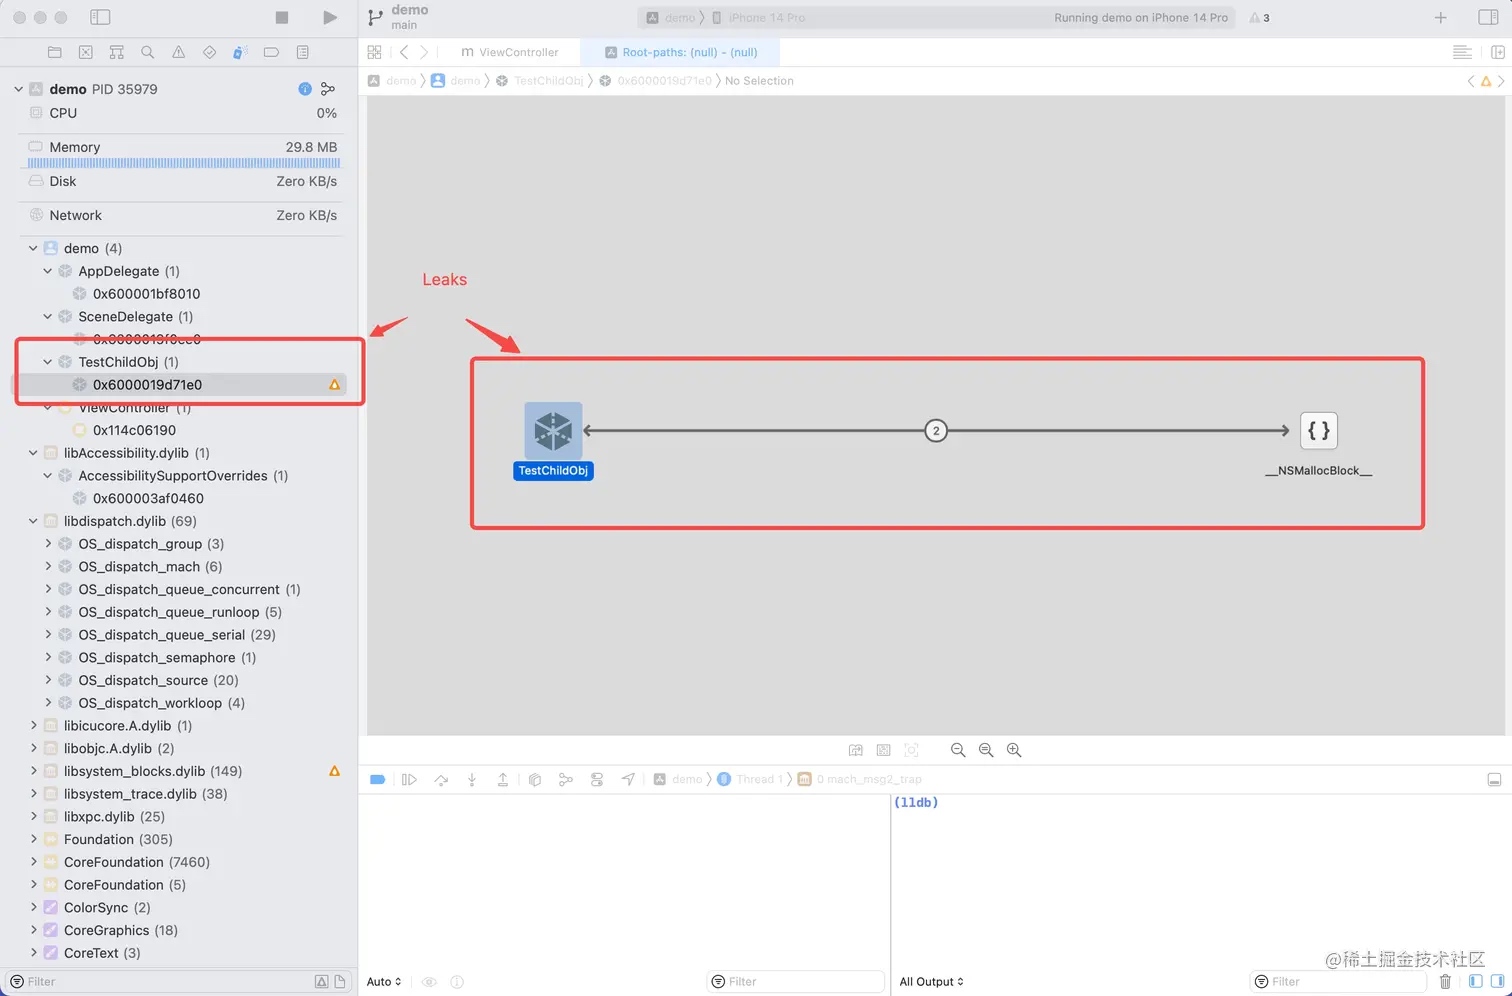
但真的有这么简单吗?编译期间 llvm 提示我们 self 变量是未被使用的,执行时的内存状态也能够证明这样确实是已经很引起了循环引用。
那这是为什么呢,难道 宏替换 与 objc_msgSendSuper 不是在同一个步骤中进行的嘛?
Preprocessed 我们先来看 Preprocess 的结果,我们只摘取 -[TestChildObj init] 的部分,此时我们可以看到 weak/strong 的宏是已经展开了的,但是 super.capture 还是原样。
1
2
3
4
5
6
7
8
9
10
11
12
13
14
15
16
17
18
19
20
21
22
23
24
25
26
27
@implementation TestChildObj - (instancetype)init { if (self = [super init]) { @try {} @catch (...) {} __attribute__((objc_ownership(weak))) __typeof__(self) self_weak_ = (self);; self.captureSelf = ^() { @try {} @catch (...) {} # 63 "/Users/bytedance/Desktop/demo/demo/ViewController.m" #pragma clang diagnostic push # 63 "/Users/bytedance/Desktop/demo/demo/ViewController.m" #pragma clang diagnostic ignored "-Wshadow" # 63 "/Users/bytedance/Desktop/demo/demo/ViewController.m" __attribute__((objc_ownership(strong))) __typeof__(self) self = self_weak_; # 63 "/Users/bytedance/Desktop/demo/demo/ViewController.m" #pragma clang diagnostic pop # 63 "/Users/bytedance/Desktop/demo/demo/ViewController.m" ; super.capture = __objc_yes; }; } return self; } @end
因此我们至少可以知道,将 super 替换为 objc_msgSendSuper 至少不在 Preprocess 阶段,并且至少在 Preprocess 阶段之后。
LLVM(Fronted) 接着我们再来继续探寻具体是在哪个步骤中进行 super 以及正常 OC 方法重写为 objc_msgsend() 的。
https://github.com/llvm-mirror/clang/blob/aa231e4be75ac4759c236b755c57876f76e3cf05/lib/Frontend/Rewrite/RewriteModernObjC.cpp#L2439 https://github.com/llvm-mirror/clang/blob/aa231e4be75ac4759c236b755c57876f76e3cf05/lib/Frontend/Rewrite/RewriteObjC.cpp#L2348
RewriteModernObjC 我们就以 Frontend/Rewrite/RewriteModernObjC.cpp 中的代码为例:
1
2
3
4
5
6
7
8
9
10
11
12
13
14
15
16
// https://github.com/llvm-mirror/clang/blob/aa231e4be75ac4759c236b755c57876f76e3cf05/lib/Frontend/Rewrite/RewriteModernObjC.cpp#L2439 // SynthMsgSendSuperFunctionDecl - id objc_msgSendSuper(void); void RewriteModernObjC::SynthMsgSendSuperFunctionDecl() { IdentifierInfo *msgSendIdent = &Context->Idents.get("objc_msgSendSuper"); SmallVector<QualType, 2> ArgTys; ArgTys.push_back(Context->VoidTy); QualType msgSendType = getSimpleFunctionType(Context->getObjCIdType(), ArgTys, /*variadic=*/true); // 初始化成员变量,Synth 的语义是 合成,可以猜到后面实际变的时候会用这个 MsgSendSuperFunctionDecl MsgSendSuperFunctionDecl = FunctionDecl::Create(*Context, TUDecl, SourceLocation(), SourceLocation(), msgSendIdent, msgSendType, nullptr, SC_Extern); }
因此继续寻找哪里使用了 MsgSendSuperFunctionDecl :
1
2
3
4
5
6
7
8
9
10
11
12
13
14
15
16
17
18
19
20
21
22
23
24
25
26
27
28
29
30
31
32
33
34
35
36
37
38
39
40
41
42
43
44
45
46
47
48
49
50
51
52
53
54
55
56
57
58
59
60
61
62
63
64
65
66
67
68
69
70
71
72
73
74
75
76
77
78
79
80
81
82
83
84
85
86
87
88
89
90
91
92
93
94
95
96
97
98
99
100
101
// https://github.com/llvm-mirror/clang/blob/aa231e4be75ac4759c236b755c57876f76e3cf05/lib/Frontend/Rewrite/RewriteModernObjC.cpp#L3224 Stmt *RewriteModernObjC::SynthMessageExpr(ObjCMessageExpr *Exp, SourceLocation StartLoc, SourceLocation EndLoc) { // 省略大段代码 // Synthesize a call to objc_msgSend(). SmallVector<Expr*, 8> MsgExprs; switch (Exp->getReceiverKind()) { case ObjCMessageExpr::SuperClass: { MsgSendFlavor = MsgSendSuperFunctionDecl; if (MsgSendStretFlavor) MsgSendStretFlavor = MsgSendSuperStretFunctionDecl; assert(MsgSendFlavor && "MsgSendFlavor is NULL!"); ObjCInterfaceDecl *ClassDecl = CurMethodDef->getClassInterface(); SmallVector<Expr*, 4> InitExprs; // set the receiver to self, the first argument to all methods. InitExprs.push_back( NoTypeInfoCStyleCastExpr(Context, Context->getObjCIdType(), CK_BitCast, new (Context) DeclRefExpr(*Context, CurMethodDef->getSelfDecl(), false, Context->getObjCIdType(), VK_RValue, SourceLocation())) ); // set the 'receiver'. // (id)class_getSuperclass((Class)objc_getClass("CurrentClass")) SmallVector<Expr*, 8> ClsExprs; ClsExprs.push_back(getStringLiteral(ClassDecl->getIdentifier()->getName())); // (Class)objc_getClass("CurrentClass") CallExpr *Cls = SynthesizeCallToFunctionDecl(GetMetaClassFunctionDecl, ClsExprs, StartLoc, EndLoc); ClsExprs.clear(); ClsExprs.push_back(Cls); Cls = SynthesizeCallToFunctionDecl(GetSuperClassFunctionDecl, ClsExprs, StartLoc, EndLoc); // (id)class_getSuperclass((Class)objc_getClass("CurrentClass")) // To turn off a warning, type-cast to 'id' InitExprs.push_back( // set 'super class', using class_getSuperclass(). NoTypeInfoCStyleCastExpr(Context, Context->getObjCIdType(), CK_BitCast, Cls)); // struct __rw_objc_super QualType superType = getSuperStructType(); Expr *SuperRep; if (LangOpts.MicrosoftExt) { SynthSuperConstructorFunctionDecl(); // Simulate a constructor call... DeclRefExpr *DRE = new (Context) DeclRefExpr(*Context, SuperConstructorFunctionDecl, false, superType, VK_LValue, SourceLocation()); SuperRep = CallExpr::Create(*Context, DRE, InitExprs, superType, VK_LValue, SourceLocation()); // The code for super is a little tricky to prevent collision with // the structure definition in the header. The rewriter has it's own // internal definition (__rw_objc_super) that is uses. This is why // we need the cast below. For example: // (struct __rw_objc_super *)&__rw_objc_super((id)self, (id)objc_getClass("SUPER")) // SuperRep = new (Context) UnaryOperator(SuperRep, UO_AddrOf, Context->getPointerType(SuperRep->getType()), VK_RValue, OK_Ordinary, SourceLocation(), false); SuperRep = NoTypeInfoCStyleCastExpr(Context, Context->getPointerType(superType), CK_BitCast, SuperRep); } else { // (struct __rw_objc_super) { <exprs from above> } InitListExpr *ILE = new (Context) InitListExpr(*Context, SourceLocation(), InitExprs, SourceLocation()); TypeSourceInfo *superTInfo = Context->getTrivialTypeSourceInfo(superType); SuperRep = new (Context) CompoundLiteralExpr(SourceLocation(), superTInfo, superType, VK_LValue, ILE, false); // struct __rw_objc_super * SuperRep = new (Context) UnaryOperator(SuperRep, UO_AddrOf, Context->getPointerType(SuperRep->getType()), VK_RValue, OK_Ordinary, SourceLocation(), false); } MsgExprs.push_back(SuperRep); break; } // 然后继续拼调用 // Create a call to sel_registerName("selName"), it will be the 2nd argument. // Now push any user supplied arguments. }
最后 super 生成的代码类似:(__rw_objc_super){(id)self, (id)class_getSuperclass(objc_getClass(“TestChildObj”))} 。
1
2
3
4
((TestChildObj *(*)(__rw_objc_super *, SEL))(void *)objc_msgSendSuper)((__rw_objc_super){(id)self, (id)class_getSuperclass(objc_getClass("TestChildObj"))}, sel_registerName("init")) // 去掉类型转换后,缩略版如下 objc_msgSendSuper({self, class_getSuperclass(objc_getClass("TestChildObj"))}, sel_registerName("init"))
而 super.capture = YES; 生成的类似:
1 ((void (*)(__rw_objc_super *, SEL, BOOL))(void *)objc_msgSendSuper)((__rw_objc_super){(id)self, (id)class_getSuperclass(objc_getClass("TestChildObj"))}, sel_registerName("setCapture:"), ((bool)1));
-ccc-print-phases 通过参数 -ccc-print-phases 我们可以打印出编译的过程,可以看到在有 -rewrite-objc 参数的时候,compiler 步骤是在 preprocessor 之后的。
1
2
3
4
5
➜ demo git:(main) ✗ clang -ccc-print-phases -rewrite-objc Child.m +- 0: input, "Child.m", objective-c +- 1: preprocessor, {0}, objective-c-cpp-output +- 2: compiler, {1}, rewritten-objc 3: bind-arch, "arm64", {2}, rewritten-objc
我们可以再看下正常的编译,正常的编译是不会有 rewritten-objc 的步骤的,但是原理上是类似的,因此上面也通过这个手段进行了分析。
1
2
3
4
5
6
7
8
➜ demo git:(main) ✗ clang -ccc-print-phases Child.m +- 0: input, "Child.m", objective-c +- 1: preprocessor, {0}, objective-c-cpp-output +- 2: compiler, {1}, ir +- 3: backend, {2}, assembler +- 4: assembler, {3}, object +- 5: linker, {4}, image 6: bind-arch, "arm64", {5}, image
Disassembly 我们最后来看下最终的汇编,验证下 super 被替换的结果。
Caller 我们替换为更简单的版本。
1
2
3
4
5
6
- (void)testCapture { -> self.captureSelf = ^() { super.capture = YES; }; self.captureSelf(); // only for into block }
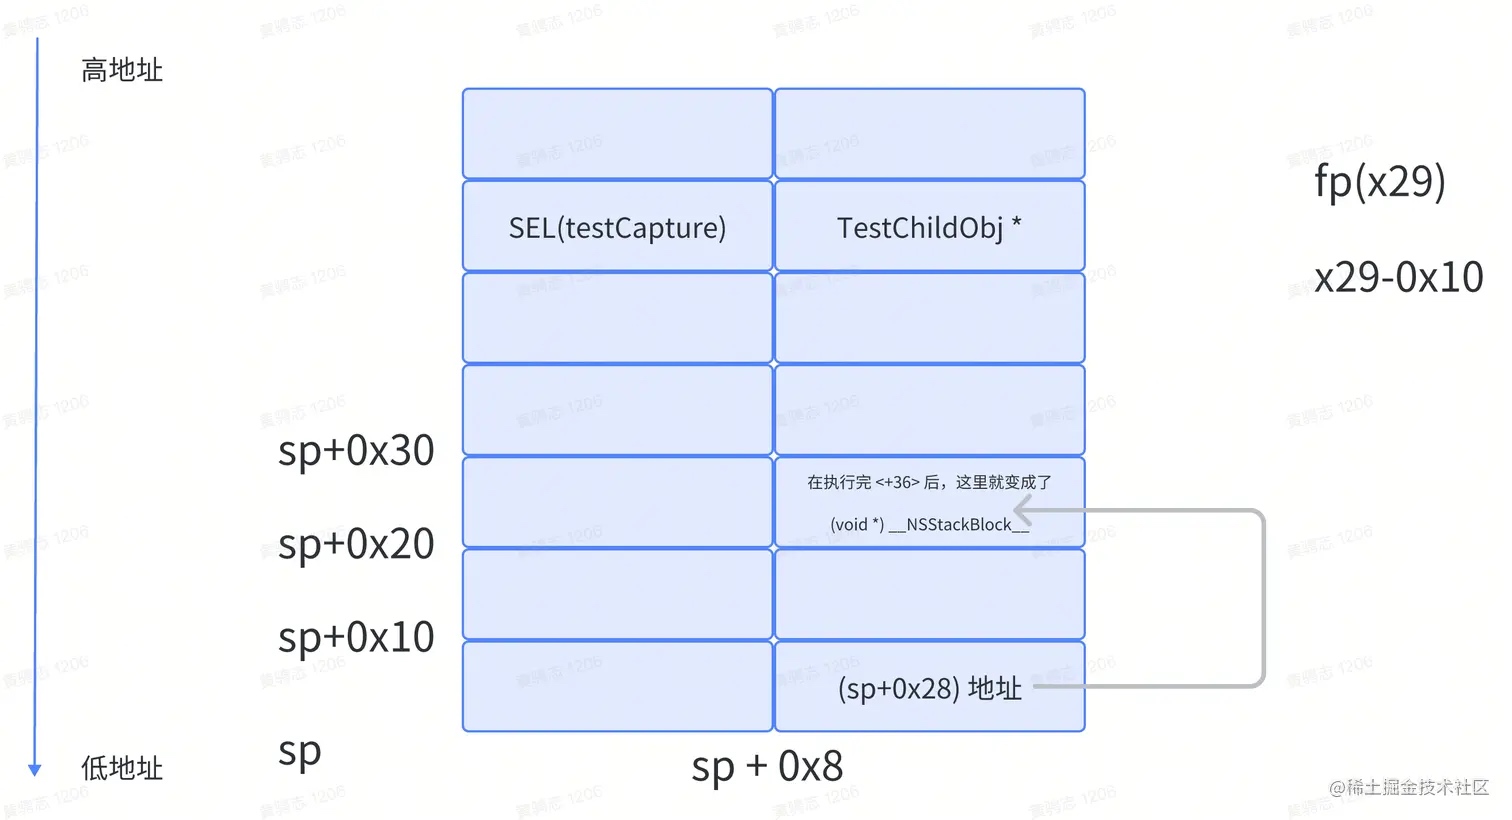
1
2
3
4
5
6
7
8
9
10
11
12
13
14
15
16
17
18
19
20
21
22
23
24
25
26
27
28
29
30
31
32
33
34
35
36
37
38
39
40
41
42
43
44
45
demo`-[TestChildObj testCapture]: 0x1047b1a98 <+0>: sub sp, sp, #0x70 0x1047b1a9c <+4>: stp x29, x30, [sp, #0x60] 0x1047b1aa0 <+8>: add x29, sp, #0x60 0x1047b1aa4 <+12>: stur x0, [x29, #-0x8] // *(x29 - 0x8) = x0 = TestChildObj * 0x1047b1aa8 <+16>: stur x1, [x29, #-0x10] // *(x29 - 0x10) = x1 = @SEL(testCapture) 0x1047b1aac <+20>: add x8, sp, #0x28 // x8 = sp + 0x28 0x1047b1ab0 <+24>: str x8, [sp, #0x8] // *(sp + 0x8) = x8 ,把 sp + 0x28 的地址存到了 sp + 0x8 的位置 0x1047b1ab4 <+28>: adrp x9, 3 0x1047b1ab8 <+32>: ldr x9, [x9, #0x10] 0x1047b1abc <+36>: str x9, [sp, #0x28] // 这里 x9 算完其实是 __NSStackBlock__ ,存到 sp + 0x28 的位置,正好是 sp + 0x8 指向的地方,但断到这一步的时候其实还没有赋值 0x1047b1ac0 <+40>: mov w9, #-0x3e000000 0x1047b1ac4 <+44>: str w9, [sp, #0x30] // *(sp + 0x30) = 0xc2000000 = (trim 成 4 Byte 的 -0x3e000000) 0x1047b1ac8 <+48>: str wzr, [sp, #0x34] // *(sp + 0x34) = 0x0 0x1047b1acc <+52>: adrp x9, 0 0x1047b1ad0 <+56>: add x9, x9, #0xb48 ; __27-[TestChildObj testCapture]_block_invoke at ViewController.m:50 0x1047b1ad4 <+60>: str x9, [sp, #0x38] // *(sp + 0x38) = 函数指针(-[TestChildObj testCapture]_block_invoke) 0x1047b1ad8 <+64>: adrp x9, 3 0x1047b1adc <+68>: add x9, x9, #0x80 ; __block_descriptor_40_e8_32s_e5_v8?0l 0x1047b1ae0 <+72>: str x9, [sp, #0x40] // *(sp + 0x40) = x9 ,其实是指向 __block_descriptor 0x1047b1ae4 <+76>: add x8, x8, #0x20 // 重新开始用 x8 了,x8 = x8 + 0x20,之前 x8 的存储在 0x1047b1ab0 <+24> 这一行里面,值为 sp + 0x28 的地址,现在执行完变成了 sp + 0x48 0x1047b1ae8 <+80>: str x8, [sp, #0x20] // *(sp + 0x20) = x8 = sp + 0x48 0x1047b1aec <+84>: ldur x0, [x29, #-0x8] // x0 = x29 - 0x8 ,这块区域其实等于 sp + 0x58,刚才存的是 TestChildObj * 0x1047b1af0 <+88>: bl 0x1047b21f0 ; symbol stub for: objc_retain // retain TestChildObj * 0x1047b1af4 <+92>: ldr x2, [sp, #0x8] // x2 = *(sp + 0x8),其实就是刚才存下来的 (sp+0x28) 地址 0x1047b1af8 <+96>: ldr x1, [sp, #0x10] // x1 = *(sp + 0x10) ,但这块内存是未初始化的,这里 x1 后续会被 Selector Stub 覆盖,因此这里随便是什么都行:) 0x1047b1afc <+100>: str x0, [sp, #0x48] // *(sp + 0x48) = x0 = TestChildObj * 0x1047b1b00 <+104>: ldur x0, [x29, #-0x8] // x0 0x1047b1b04 <+108>: bl 0x1047b2280 ; objc_msgSend$setCaptureSelf: 0x1047b1b08 <+112>: ldr x1, [sp, #0x10] 0x1047b1b0c <+116>: ldur x0, [x29, #-0x8] 0x1047b1b10 <+120>: bl 0x1047b2220 ; objc_msgSend$captureSelf 0x1047b1b14 <+124>: mov x29, x29 0x1047b1b18 <+128>: bl 0x1047b21fc ; symbol stub for: objc_retainAutoreleasedReturnValue 0x1047b1b1c <+132>: str x0, [sp, #0x18] 0x1047b1b20 <+136>: ldr x8, [x0, #0x10] 0x1047b1b24 <+140>: blr x8 0x1047b1b28 <+144>: ldr x0, [sp, #0x18] 0x1047b1b2c <+148>: bl 0x1047b21e4 ; symbol stub for: objc_release 0x1047b1b30 <+152>: ldr x0, [sp, #0x20] 0x1047b1b34 <+156>: mov x1, #0x0 0x1047b1b38 <+160>: bl 0x1047b2214 ; symbol stub for: objc_storeStrong 0x1047b1b3c <+164>: ldp x29, x30, [sp, #0x60] 0x1047b1b40 <+168>: add sp, sp, #0x70 0x1047b1b44 <+172>: ret
没想到短短几句赋值,在汇编会有这么长,让我们一步一步来分析下。
我会提供执行到这里的时候的内存示意图与 po 输出。
Step 1 对于栈上的操作既可以用 sp 为基准计算偏移,也可以用 fp(x29) 为基准计算偏移,因此图中我都会标出。
1
2
3
0x1047b1a98 <+0>: sub sp, sp, #0x70 0x1047b1a9c <+4>: stp x29, x30, [sp, #0x60] 0x1047b1aa0 <+8>: add x29, sp, #0x60
前三行就是正常的 push Stack 操作,这次在 Stack 上占用了 0x70 的空间,然后把 x29,x30 存到了 Stack 上。
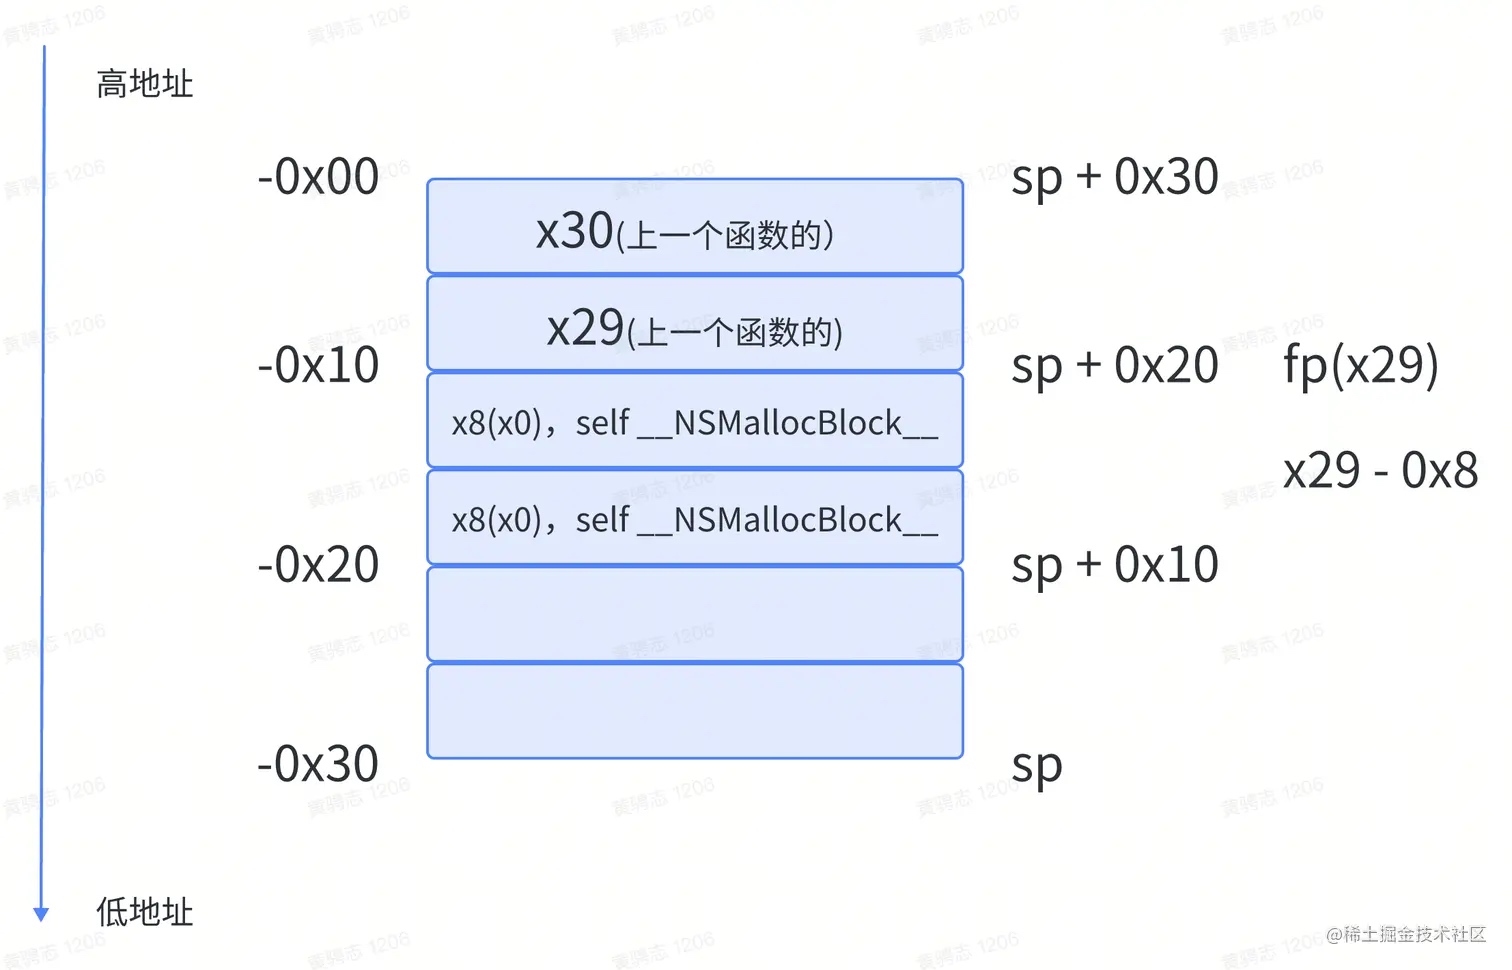
1
2
3
4
5
6
7
0x1047b1aa4 <+12>: stur x0, [x29, #-0x8] // *(x29 - 0x8) = x0 = TestChildObj * 0x1047b1aa8 <+16>: stur x1, [x29, #-0x10] // *(x29 - 0x10) = x1 = @SEL(testCapture) 0x1047b1aac <+20>: add x8, sp, #0x28 // x8 = sp + 0x28 0x1047b1ab0 <+24>: str x8, [sp, #0x8] // *(sp + 0x8) = x8 ,把 sp + 0x28 的地址存到了 sp + 0x8 的位置 0x1047b1ab4 <+28>: adrp x9, 3 0x1047b1ab8 <+32>: ldr x9, [x9, #0x10] -> 0x1047b1abc <+36>: str x9, [sp, #0x28] // 这里 x9 算完其实是 __NSStackBlock__ ,存到 sp + 0x28 的位置,正好是 sp + 0x8 指向的地方,但断到这一步的时候其实还没有赋值
正式逻辑开始,前两步是把 x0 , x1 存到了对应 Stack 的内存里。
1
2
3
4
5
6
7
8
9
10
11
12
13
14
15
16
17
18
19
20
(lldb) reg read x0 x0 = 0x0000600002220c80 (lldb) po 0x0000600002220c80 <TestChildObj: 0x600002220c80> (lldb) reg read x1 x1 = 0x00000001047b2489 "testCapture" (lldb) reg read sp sp = 0x000000016b64b930 (lldb) memory read 0x000000016b64b930 (0x000000016b64b930+0x70) ⬇️ 指向 sp + 0x28 = 0x16b64b958 0x16b64b930: 00 00 00 00 00 90 78 c0 58 b9 64 6b 01 00 00 00 ......x.X.dk.... 0x16b64b940: 80 0c 22 02 00 60 00 00 89 24 7b 04 01 00 00 00 .."..`...${..... 0x16b64b950: 08 92 7b 04 01 00 00 00 b4 98 18 80 01 00 00 00 ..{............. 0x16b64b960: 04 00 00 00 00 00 00 00 00 00 00 00 00 00 00 00 ................ 0x16b64b970: 73 73 5f 62 61 72 73 00 d0 07 00 00 00 00 00 00 ss_bars......... ⬇️@SEL(testCapture) ⬇️TestChildObj * 0x16b64b980: 89 24 7b 04 01 00 00 00 80 0c 22 02 00 60 00 00 .${......."..`.. 0x16b64b990: f0 b9 64 6b 01 00 00 00 60 1a 7b 04 01 00 00 00 ..dk....`.{..... (lldb) reg read x9 x9 = 0x00000001bb8c0f60 (void *)0x00000001bb8c0f38: __NSStackBlock__
memory read 0x000000016b64b930 (0x000000016b64b930+0x70) 就是打出了与示意图对应的内存区域。可以在内存中看到对应的对象,我已经标注在内存中了。
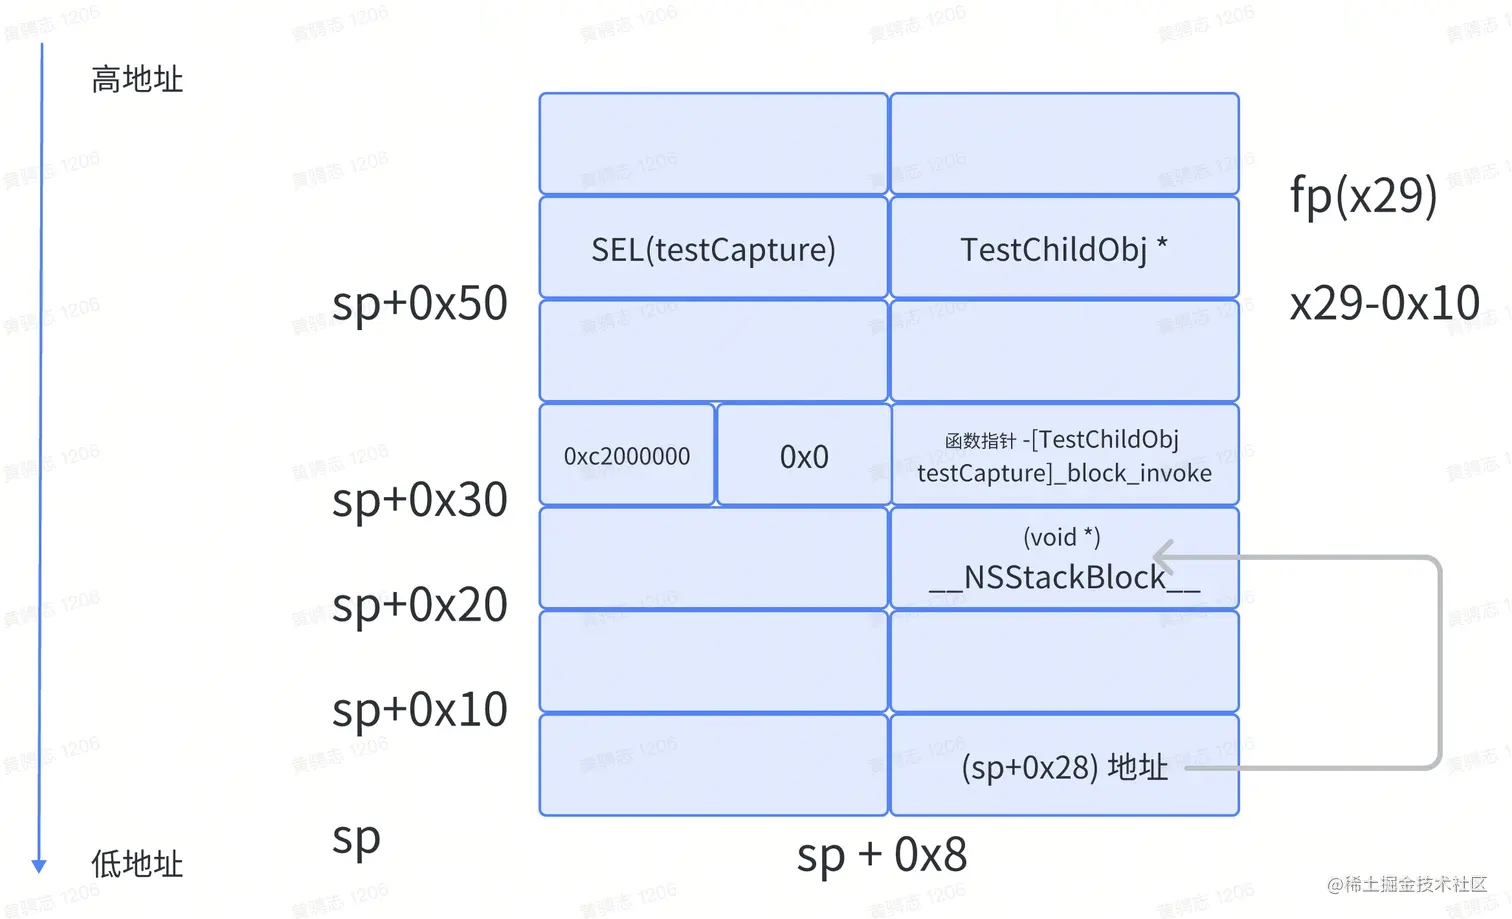
Step 2 1 2 3 4 5 6 7 8 0x1047b1abc <+36>: str x9, [sp, #0x28] // 这里 x9 算完其实是 __NSStackBlock__ ,存到 sp + 0x28 的位置,正好是 sp + 0x8 指向的地方,但断到这一步的时候其实还没有赋值 0x1047b1ac0 <+40>: mov w9, #-0x3e000000 0x1047b1ac4 <+44>: str w9, [sp, #0x30] // *(sp + 0x30) = 0xc2000000 = (trim 成 4 Byte 的 -0x3e000000) 0x1047b1ac8 <+48>: str wzr, [sp, #0x34] // *(sp + 0x34) = 0x0 0x1047b1acc <+52>: adrp x9, 0 0x1047b1ad0 <+56>: add x9, x9, #0xb48 ; __27-[TestChildObj testCapture]_block_invoke at ViewController.m:50 0x1047b1ad4 <+60>: str x9, [sp, #0x38] // *(sp + 0x38) = 函数指针(-[TestChildObj testCapture]_block_invoke) -> 0x1047b1ad8 <+64>: adrp x9, 3
<+40 ~ +44> 先把 w9 是 x9 寄存器的低 32 位,存进去的值会被 trim 成 4 Byte 的,最后写入 sp + 0x30 ~ sp + 0x34 位置的是 0xc2000000 。这里的意义是 Block_layout 中的 volatile int32_t flags; 。
1 2 3 4 5 6 7 8 9 (lldb) memory read 0x000000016b64b930 (0x000000016b64b930+0x70) 0x16b64b930: 00 00 00 00 00 90 78 c0 58 b9 64 6b 01 00 00 00 ......x.X.dk.... 0x16b64b940: 80 0c 22 02 00 60 00 00 89 24 7b 04 01 00 00 00 .."..`...${..... 0x16b64b950: 08 92 7b 04 01 00 00 00 60 0f 8c bb 01 00 00 00 ..{.....`....... ⬇️ ⬇️0x0 ⬇️0x01047b1b48(函数指针) 0x16b64b960: 00 00 00 c2 00 00 00 00 48 1b 7b 04 01 00 00 00 ........H.{..... 0x16b64b970: 80 40 7b 04 01 00 00 00 d0 07 00 00 00 00 00 00 .@{............. 0x16b64b980: 89 24 7b 04 01 00 00 00 80 0c 22 02 00 60 00 00 .${......."..`.. 0x16b64b990: f0 b9 64 6b 01 00 00 00 60 1a 7b 04 01 00 00 00 ..dk....`.{.....
Step 3 1 2 3 4 5 6 7 8 9 10 11 12 0x1047b1ad8 <+64>: adrp x9, 3 0x1047b1adc <+68>: add x9, x9, #0x80 ; __block_descriptor_40_e8_32s_e5_v8?0l 0x1047b1ae0 <+72>: str x9, [sp, #0x40] // *(sp + 0x40) = x9 ,其实是指向 __block_descriptor 0x1047b1ae4 <+76>: add x8, x8, #0x20 // 重新开始用 x8 了,x8 = x8 + 0x20,之前 x8 的存储在 0x1047b1ab0 <+24> 这一行里面,值为 sp + 0x28 的地址,现在执行完变成了 sp + 0x48 0x1047b1ae8 <+80>: str x8, [sp, #0x20] // *(sp + 0x20) = x8 = sp + 0x48 0x1047b1aec <+84>: ldur x0, [x29, #-0x8] // x0 = x29 - 0x8 ,这块区域其实等于 sp + 0x58,刚才存的是 TestChildObj * 0x1047b1af0 <+88>: bl 0x1047b21f0 ; symbol stub for: objc_retain // retain TestChildObj * 0x1047b1af4 <+92>: ldr x2, [sp, #0x8] // x2 = *(sp + 0x8),其实就是刚才存下来的 (sp+0x28) 地址 0x1047b1af8 <+96>: ldr x1, [sp, #0x10] // x1 = *(sp + 0x10) ,但这块内存是未初始化的, x1 的值应该是无效的。 0x1047b1afc <+100>: str x0, [sp, #0x48] // *(sp + 0x48) = x0 = TestChildObj * 0x1047b1b00 <+104>: ldur x0, [x29, #-0x8] // x0 -> 0x1047b1b04 <+108>: bl 0x1047b2280 ; objc_msgSend$setCaptureSelf:
<+64 ~ +72> 把 __block_descriptor 的指针存到了 sp + 0x40 的位置。这里的意义是 Block_layout 中的 struct Block_descriptor_1 *descriptor; 。
我们回忆下 Block_descriptor 的结构,对应的 size 是 0x28 ,能够印证大小不是 0x20,而是还有一个 8 个 Byte 的 id 类型指针,至此,完成实锤,rewrite 生成的代码是错误的。
1 2 3 4 5 6 7 (lldb) reg read x9 x9 = 0x00000001047b4080 demo`__block_descriptor_40_e8_32s_e5_v8?0l (lldb) memory read 0x00000001047b4080 0x1047b4080: 00 00 00 00 00 00 00 00 28 00 00 00 00 00 00 00 ........(....... 0x1047b4090: 9c 1b 7b 04 01 00 00 00 d4 1b 7b 04 01 00 00 00 ..{.......{.....
1 2 3 4 5 #define BLOCK_DESCRIPTOR_1 1 struct Block_descriptor_1 { uintptr_t reserved; uintptr_t size; };
我们继续看内存分布与寄存器的值。
1 2 3 4 5 6 7 8 9 10 11 12 13 14 15 16 17 18 19 20 21 22 23 24 25 26 27 (lldb) memory read 0x000000016b64b930 (0x000000016b64b930+0x70) 0x16b64b930: 00 00 00 00 00 90 78 c0 58 b9 64 6b 01 00 00 00 ......x.X.dk.... 0x16b64b940: 80 0c 22 02 00 60 00 00 89 24 7b 04 01 00 00 00 .."..`...${..... 0x16b64b950: 78 b9 64 6b 01 00 00 00 60 0f 8c bb 01 00 00 00 x.dk....`....... 0x16b64b960: 00 00 00 c2 00 00 00 00 48 1b 7b 04 01 00 00 00 ........H.{..... 0x16b64b970: 80 40 7b 04 01 00 00 00 80 0c 22 02 00 60 00 00 .@{......."..`.. 0x16b64b980: 89 24 7b 04 01 00 00 00 80 0c 22 02 00 60 00 00 .${......."..`.. 0x16b64b990: f0 b9 64 6b 01 00 00 00 60 1a 7b 04 01 00 00 00 ..dk....`.{..... (lldb) reg read General Purpose Registers: x0 = 0x0000600002220c80 x1 = 0x0000600002220c80 // 这里 x1 跟 x0 一样是巧合,x1 是从未初始化的 Stack 区域中获取的 x2 = 0x000000016b64b958 (lldb) po 0x0000600002220c80 // x0 <TestChildObj: 0x600002220c80> (lldb) po 0x0000600002220c80 // x1,这个不是 @SEL(setCaptureSelf:),原因看 objc_msgSend Stub <TestChildObj: 0x600002220c80> (lldb) po 0x000000016b64b958 // x2 <__NSStackBlock__: 0x16b64b958> signature: "v8@?0" invoke : 0x1047b1b48 copy : 0x1047b1b9c dispose : 0x1047b1bd4
于是这里得到了实锤,因此也更可有底气得得到结论: sp + 0x28 ~ sp + 0x50 是对应 Block_layout 的大小,变量能够一一对应。RewriteObjC 生成的 C++ 代码存在 bug 。
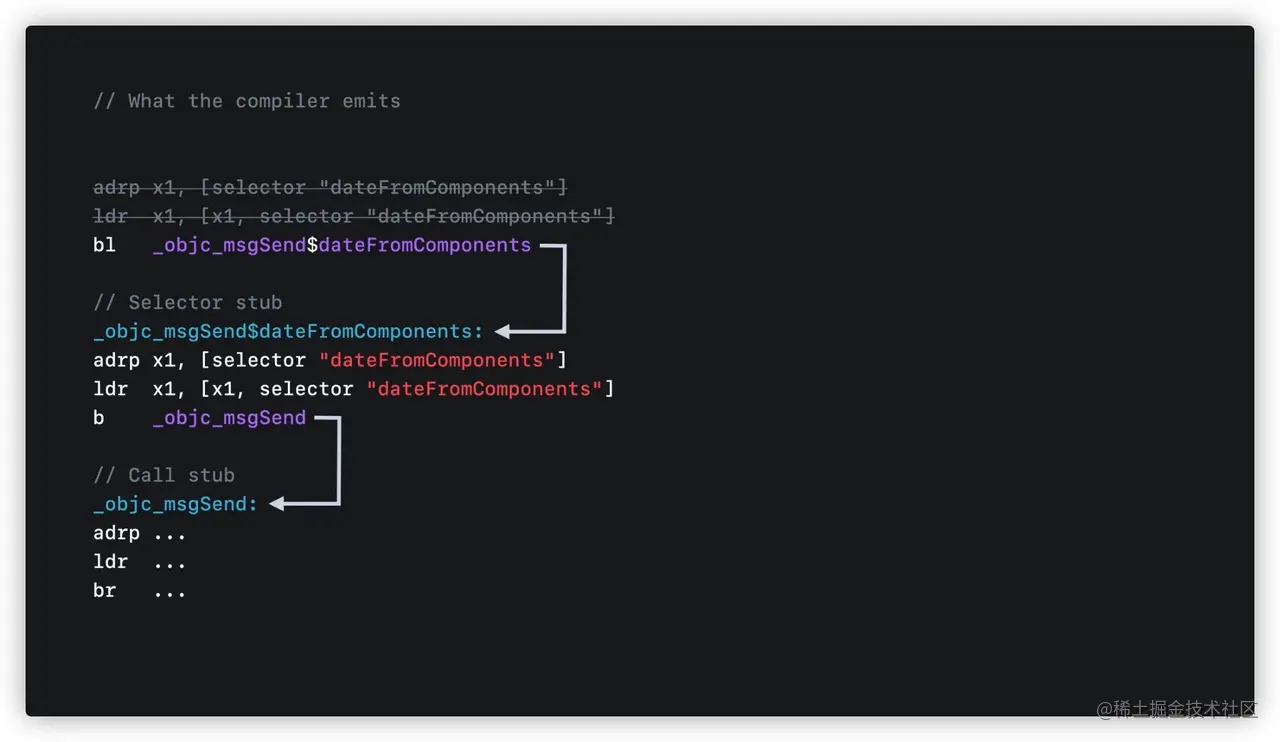
objc_msgSend Stub 关于这个 x1 不是 @SEL 的情况,请教了下相关同学后了解到 ,实际是 Xcode 14 新引入的优化:objc_msgSend Stub 的改动,只要使用 Xcode 14 打包,即使在之前的 OS 系统上对包大小也有帮助。
可以看:
【WWDC22 110363】App 包大小优化和 Runtime 上的性能提升 - 小专栏 ,ld64.lld: Add support for _objc_msgSend stubs from Xcode 14 · Issue #56034 · llvm/llvm-projec…
分析 Caller 的最后,我们再对应下 C++ 代码,加深一下理解。
1 ((void (*)(id, SEL, void (*)()))(void *)objc_msgSend)((id)self, sel_registerName("setCaptureSelf:"), ((void (*)())&__TestChildObj__testSuperCapture_block_impl_0((void *)__TestChildObj__testSuperCapture_block_func_0, &__TestChildObj__testSuperCapture_block_desc_0_DATA)));
Callee 接着我们再分析下 _block_invoke 内的调用。
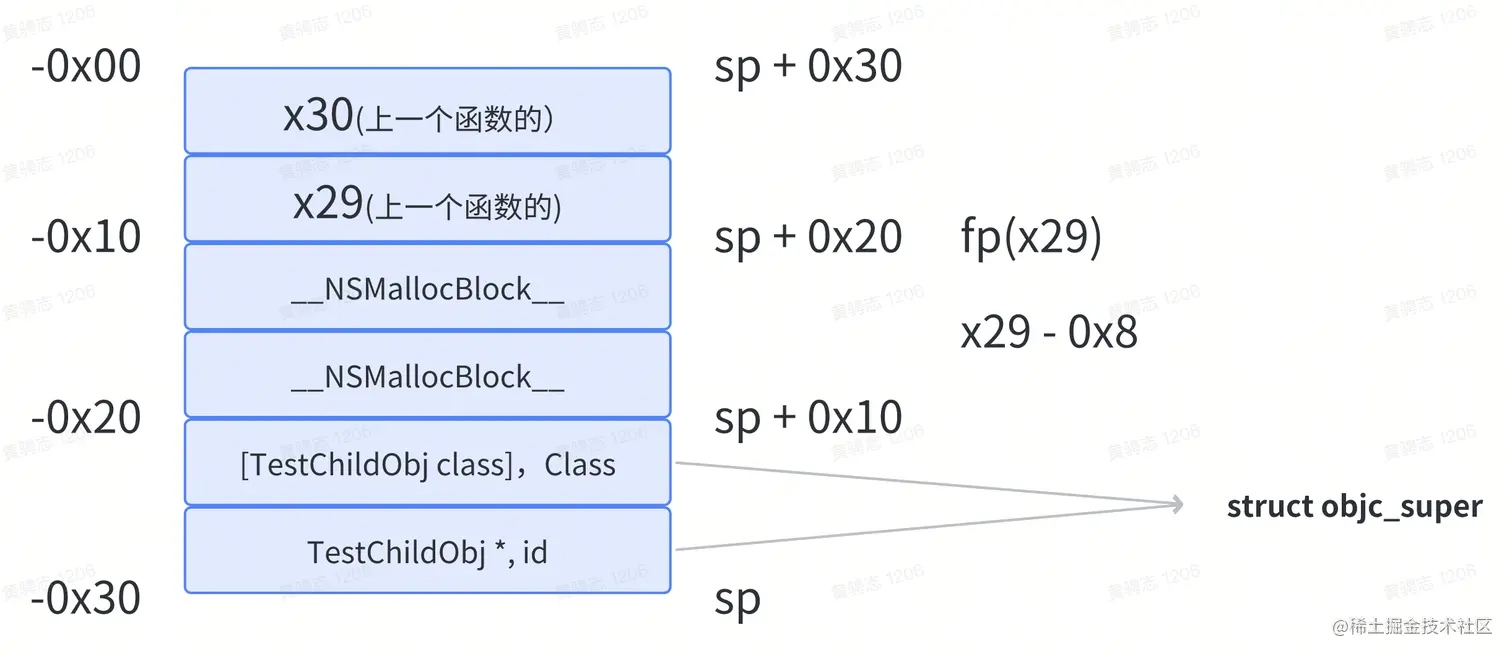
1 2 3 4 5 6 7 8 9 10 11 12 13 14 15 16 17 18 19 20 21 22 23 24 25 // #0 0x0000000100909b64 in __27-[TestChildObj testCapture]_block_invoke (lldb) dis demo`: 0x100909b48 <+0>: sub sp, sp, #0x30 0x100909b4c <+4>: stp x29, x30, [sp, #0x20] 0x100909b50 <+8>: add x29, sp, #0x20 0x100909b54 <+12>: mov x8, x0 // 逻辑正式开始, x8 = x0, x0 是 __NSMallocBlock__ 对象, type == Block_layout 0x100909b58 <+16>: stur x8, [x29, #-0x8] // 把 x0(x8) 存到 x29 - 0x8 的位置 0x100909b5c <+20>: mov x8, x0 // x8 = x0 0x100909b60 <+24>: str x8, [sp, #0x10] // *(sp + 0x10) = x8(x0) 0x100909b64 <+28>: ldr x8, [x0, #0x20] // x8 = *(x0 + 0x20),x0 + 0x20 的位置其实是 TestChildObjc * ,原因我们之前已经解释过了,这里可以再次实锤 capture 了 TestChildObj 对象 0x100909b68 <+32>: mov x0, sp // x0 = sp,栈上的地址,注意这里是直接赋值,不是 x0 = *sp ,sp 的内存是未定义的,不理解为什么内存为定义可以看 [OC 局部变量未初始化的危险性](https://tech.bytedance.net/articles/7187275573624832061)。这里需要知道下 objc_msgSendSuper2 的第一个参数传了什么(答案是:栈上的地址),能够更好的理解 0x100909b6c <+36>: str x8, [sp] // *sp = x8 = TestChildObjc * 0x100909b70 <+40>: adrp x8, 8 0x100909b74 <+44>: ldr x8, [x8, #0x198] 0x100909b78 <+48>: str x8, [sp, #0x8] // *(sp + 0x8) = x8 ,x8 其实是 [TestChildObj class], Class 类型 0x100909b7c <+52>: adrp x8, 8 0x100909b80 <+56>: ldr x1, [x8, #0x148] // 经过一系列操作(略),x1 变成了 @selector(setCapture:) 0x100909b84 <+60>: mov w8, #0x1 0x100909b88 <+64>: and w2, w8, #0x1 // w2 = YES 0x100909b8c <+68>: bl 0x10090a1cc ; symbol stub for: objc_msgSendSuper2 0x100909b90 <+72>: ldp x29, x30, [sp, #0x20] 0x100909b94 <+76>: add sp, sp, #0x30 0x100909b98 <+80>: ret
Step 1 1 2 3 4 5 6 7 8 0x100909b48 <+0>: sub sp, sp, #0x30 0x100909b4c <+4>: stp x29, x30, [sp, #0x20] 0x100909b50 <+8>: add x29, sp, #0x20 0x100909b54 <+12>: mov x8, x0 # 逻辑正式开始, x8 = x0, x0 是 __NSMallocBlock__ 对象, type == Block_layout 0x100909b58 <+16>: stur x8, [x29, #-0x8] // 把 x0(x8) 存到 x29 - 0x8 的位置 0x100909b5c <+20>: mov x8, x0 // x8 = x0 0x100909b60 <+24>: str x8, [sp, #0x10] // *(sp + 0x10) = x8(x0) -> 0x100909b64 <+28>: ldr x8, [x0, #0x20] // x8 = *(x0 + 0x20),x0 + 0x20 的位置其实是 TestChildObjc * ,原因我们之前已经解释过了,这里可以再次实锤 capture 了 TestChildObj 对象
<+12 ~ +28>做的是把 NSMallocBlock 指针塞到 sp + 0x10 跟 sp + 0x18 两个位置。
这里额外说一句,Block 之所以可以 po 出信息,是因为第一个变量其实也是 isa 指针,可以当一个更广义的对象。
1 2 3 4 5 6 7 8 9 10 11 12 13 14 15 16 17 // 刚执行到 <+28> 时内存的样子 (lldb) reg read x29 fp = 0x000000016f4f3920 (lldb) reg read sp sp = 0x000000016f4f3900 (lldb) memory read 0x000000016f4f3900 0x16f4f3900: 20 39 4f 6f 01 00 00 00 7c 1f 0b 80 01 00 00 00 9Oo....|....... 0x16f4f3910: 90 1e ec 00 00 60 00 00 90 1e ec 00 00 60 00 00 .....`.......`.. (lldb) reg read x0 x0 = 0x0000600000ec1e90 (lldb) po 0x0000600000ec1e90 <__NSMallocBlock__: 0x600000ec1e90> signature: "v8@?0" invoke : 0x100909b48 (/Users/bytedance/Library/Developer/CoreSimulator/Devices/900AF9D9-1C4F-47B0-83CA-D4D14D8503D3/data/Containers/Bundle/Application/E3764F89-79A4-4C8F-8E2C-029EE7895F8B/demo.app/demo`__27-[TestChildObj testCapture]_block_invoke) copy : 0x100909b9c (/Users/bytedance/Library/Developer/CoreSimulator/Devices/900AF9D9-1C4F-47B0-83CA-D4D14D8503D3/data/Containers/Bundle/Application/E3764F89-79A4-4C8F-8E2C-029EE7895F8B/demo.app/demo`__copy_helper_block_e8_32s) dispose : 0x100909bd4 (/Users/bytedance/Library/Developer/CoreSimulator/Devices/900AF9D9-1C4F-47B0-83CA-D4D14D8503D3/data/Containers/Bundle/Application/E3764F89-79A4-4C8F-8E2C-029EE7895F8B/demo.app/demo`__destroy_helper_block_e8_32s)
Step 2 1 2 3 4 0x100909b64 <+28>: ldr x8, [x0, #0x20] // x8 = *(x0 + 0x20),x0 + 0x20 的位置其实是 TestChildObjc * ,原因我们之前已经解释过了,这里可以再次实锤 capture 了 TestChildObj 对象 0x100909b68 <+32>: mov x0, sp // x0 = sp,栈上的地址,注意这里是直接赋值,不是 x0 = *sp ,sp 的内存是未定义的。这里需要知道下 objc_msgSendSuper2 的第一个参数传了什么(答案是:栈上的地址),能够更好的理解 0x100909b6c <+36>: str x8, [sp] // *sp = x8 = TestChildObjc * -> 0x100909b70 <+40>: adrp x8, 8
<+28> 把 x8 赋值为了 TestChildObjc *。
1 ((void (*)(__rw_objc_super *, SEL, BOOL))(void *)objc_msgSendSuper)((__rw_objc_super){(id)self, (id)class_getSuperclass(objc_getClass("TestChildObj"))}, sel_registerName("setCapture:"), ((bool)1));
<+36> 把 x8 塞到了 sp 指向的地址,sp 的内存完成了初始化。
Step 3 1 2 3 4 0x100909b70 <+40>: adrp x8, 8 0x100909b74 <+44>: ldr x8, [x8, #0x198] 0x100909b78 <+48>: str x8, [sp, #0x8] // *(sp + 0x8) = x8 ,x8 其实是 [TestChildObj class], Class 类型 -> 0x100909b7c <+52>: adrp x8, 8
<+40 ~ +48> 这里就很简单了,把 [TestChildObj class] 存到了 sp + 0x8 的位置。到这里,struct objc_super 就初始化完成了。后面就能正常调用了。
Step 4 1 2 3 4 5 0x100909b7c <+52>: adrp x8, 8 0x100909b80 <+56>: ldr x1, [x8, #0x148] // 经过一系列操作(略),x1 变成了 @selector(setCapture:) 0x100909b84 <+60>: mov w8, #0x1 0x100909b88 <+64>: and w2, w8, #0x1 // w2 = YES 0x100909b8c <+68>: bl 0x10090a1cc ; symbol stub for: objc_msgSendSuper2
<+52 ~ +56> 将 x1 赋值成了 @selector(setCapture:)。
Q2 的 解法 第一种解法就是额外开一个函数,通过 self 去调用。例如这样:
1 2 3 4 5 6 7 8 9 10 11 12 13 14 15 16 17 18 19 20 @implementation TestChildObj - (instancetype)init { if (self = [super init]) { @weakify(self); self.captureSelf = ^() { @strongify(self); [self callSetSuperCapture:YES]; super.capture = YES; }; } return self; } - (void)callSetSuperCapture:(BOOL)capture { super.capture = YES; } @end
但这种解法不是很优雅,去看实现的时候还得跳转,还是直接在 Block 内调用会合适一些。
因此我们给出第二个解法,来自公司内 APM 团队的实现启发,XIG 是自己工程自己定义的前缀,具体可以根据实际调用场景再补充一些定义。
1 2 3 4 5 6 7 8 9 10 #define xig_create_super_info(thisSelf, superClass) \ struct objc_super xig_super_info = { \ .receiver = (thisSelf), \ .super_class = (superClass) } #define xig_void_msgSendSuper_void(super_info, selector) \ ((void (*)(struct objc_super *, SEL))objc_msgSendSuper)((super_info), (selector)) #define xig_void_msgSendSuper_BOOL(super_info, selector, BOOLValue) \ ((void (*)(struct objc_super *, SEL, BOOL))objc_msgSendSuper)((super_info), (selector), (BOOLValue))
使用示例的话,就可以这样
1 2 3 4 5 6 7 @weakify(self); self.captureSelf = ^() { @strongify(self); xig_create_super_info(self, SuperClass.class); // SuperClass 需要替换成各自真实的类 xig_void_msgSendSuper_BOOL(&xig_super_info, @selector(setCapture:), YES); // super.capture = YES; };
结论 因此结果很清晰了,宏替换的步骤在 Rewrite(Fronted) 之前,因此在宏替换时,super 依旧还是 super,不能被 weakify/strongify(self) 替换为弱引用。
参考 iOS汇编教程(五)Objc Block 的内存布局和汇编表示 - 掘金 02-探究iOS底层原理|编译器LLVM项目【Clang、SwiftC、优化器、LLVM、Xcode编译的过程】 - 掘金 Block-ABI-Apple OC 局部变量未初始化的危险性 - 掘金 【WWDC22 110363】App 包大小优化和 Runtime 上的性能提升