Git 相关 lfs 转换普通文件为LFS托管 如果项目是从外部导入或从SVN导入的,本地全部历史都需进行LFS转换,且需保留历史的,请使用以下方式:
如何知道全部的commit历史中哪些文件过大?必须使用(git-lfs/2.7.1及以上版本)
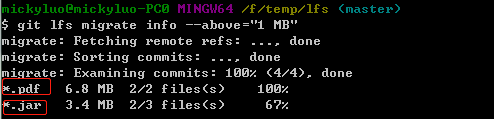
1 git lfs migrate info --above="1 MB" --everything --top 10
1 git lfs migrate import --include="*.jar,*.pdf" --everything
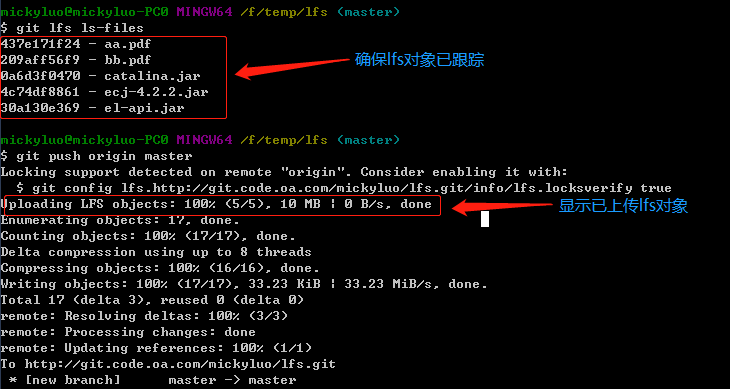
确保lfs对象已跟踪后,推送到远端。(push全部可以 git push origin -f –all && git push origin -f –tags,如果还不成功尝试git lfs push -f)
LFS对象转换会改写历史记录(即commit sha1会发生变化),再更新原(github或svn)项目时会产生大量冲突。只适用一次迁移的情形,不适用github或svn和工蜂并行使用。(以后还有更新github或svn,需要重新clone一份,再做一次git lfs migrate)
清理 lfs 空间 效果如下:
1
2
3
4
5
6
7
8
9
~/D/C/b/Feature » ids 16:05:39 70G ~/D/C/b/Feature » git lfs prune 16:05:48 prune: 13266 local objects, 8375 retained, done. prune: Deleting objects: 100% (4892/4892), done. ~/D/C/b/Feature » ids 16:05:57 55G .
如果遇到 Prune error:XXX too many open files
lfs 文件损坏 先试试
1
2
3
git lfs uninstall git reset --hard git lfs install
不行的话试试下面注意 会移除没有提交的更改
1
2
3
4
git rm --cached -r . git reset --hard git reset . git checkout .
还不行执行下面的
1
2
3
4
ulimit -n 8012 git lfs prune git lfs fsck git lfs pull
删除无用本地分支 1 git branch | xargs git branch -d
error: The following untracked working tree files would be overwritten by checkout: git pull 之后 显示 错误 error: The following untracked working tree files would be overwritten by checkout:
1
2
git fetch --all git reset --hard origin/{{branch name}}
修改最近多次的 commit message 参考链接
1
2
3
4
5
6
7
8
9
10
11
12
13
14
15
16
17
18
19
20
// 1. git log, 查看最近的提交记录 git log // 2. 退出记录列表, 确定修改范围为最近 "n" 次提交 git rebase -i HEAD~n // 3. 会弹出一个编辑页, 大概如下 pick faa85e8c2b5 log pick 5e2e23acad9 log pick ab220563c33 log ... // 4. 找到需要修改的记录行, 将 "pick" 改成 "reword", 如下: pick faa85e8c2b5 log reword 5e2e23acad9 log reword ab220563c33 log ... // 5. 保存并退出, 会自动弹出下一个编辑页, 保存修改为新的记录即可 // 正常操作到此结束 // 6. 如果没有正常弹出, 说明第 4 步修改有问题 重新修改下 git rebase --edit-todo // 7. 触发更新记录的修改页 git rebase --continue
编译信息放在当前目录 1 git update-index --skip-worktree DerivedData/
然后在 cat ~/.gitignore_global 加上
cherry-pick 将代码从一个分支转移到另一个分支
转移一个 commit 节点
1 git cherry-pick <commitHash>
转移 A(不含) 到 B (包含)的所有节点, A / B 均为 <commitHash>
转移 A(包含) 到 B (包含)的所有节点
Shell 脚本 Shell 语法 定义数组
1 dateList=("2023-08-01" "2023-08-02")
数组长度
遍历
1
2
3
4
for date in "${dateList[@]}" do echo $date done
是否输入参数
1
2
3
if [ -n "$1" ]; then echo $skipCount fi
计算
1
2
3
4
5
6
7
8
9
10
11
12
13
14
15
16
17
18
19
20
21
22
23
24
25
26
27
28
29
30
#!/bin/bash # author:菜鸟教程 # url:www.runoob.com a=10 b=20 val=`expr $a + $b` echo "a + b : $val" val=`expr $a - $b` echo "a - b : $val" val=`expr $a \* $b` echo "a * b : $val" val=`expr $b / $a` echo "b / a : $val" val=`expr $b % $a` echo "b % a : $val" if [ $a == $b ] then echo "a 等于 b" fi if [ $a != $b ] then echo "a 不等于 b" fi
比较大小
1
2
3
4
5
6
7
8
9
10
11
12
13
14
15
16
17
18
19
20
21
22
23
24
25
26
27
28
29
30
31
32
33
34
35
36
37
38
39
40
41
42
43
#!/bin/bash a=10 b=20 if [ $a -eq $b ]then echo "$a -eq $b : a 等于 b" else echo "$a -eq $b : a 不等于 b" fi if [ $a -ne $b ]then echo "$a -ne $b : a 不等于 b" else echo "$a -ne $b : a 等于 b" fi if [ $a -gt $b ]then echo "$a -gt $b : a 大于 b" else echo "$a -gt $b : a 不大于 b" fi if [ $a -lt $b ]then echo "$a -lt $b : a 小于 b" else echo "$a -lt $b : a 不小于 b" fi if [ $a -ge $b ]then echo "$a -ge $b : a 大于或等于 b" else echo "$a -ge $b : a 小于 b" fi if [ $a -le $b ]then echo "$a -le $b : a 小于或等于 b" else echo "$a -le $b : a 大于 b" fi
字符串运算符
运算符
说明
举例
=
检测两个字符串是否相等,相等返回 true。
[ $a = $b ] 返回 false。
!=
检测两个字符串是否不相等,不相等返回 true。
[ $a != $b ] 返回 true。
-z
检测字符串长度是否为0,为0返回 true。
[ -z $a ] 返回 false。
-n
检测字符串长度是否不为 0,不为 0 返回 true。
[ -n “$a” ] 返回 true。
$
检测字符串是否不为空,不为空返回 true。
[ $a ] 返回 true。
1
2
3
4
5
6
7
8
9
10
11
12
13
14
15
16
17
18
19
20
21
22
23
24
25
26
27
28
29
30
31
32
33
34
35
36
37
#!/bin/bash # author:菜鸟教程 # url:www.runoob.com a="abc" b="efg" if [ $a = $b ] then echo "$a = $b : a 等于 b" else echo "$a = $b: a 不等于 b" fi if [ $a != $b ] then echo "$a != $b : a 不等于 b" else echo "$a != $b: a 等于 b" fi if [ -z $a ] then echo "-z $a : 字符串长度为 0" else echo "-z $a : 字符串长度不为 0" fi if [ -n "$a" ] then echo "-n $a : 字符串长度不为 0" else echo "-n $a : 字符串长度为 0" fi if [ $a ] then echo "$a : 字符串不为空" else echo "$a : 字符串为空" fi
find find 多种匹配
1 find . -name "*\+*.h" -o -name "*\+*.m"
find then copy
1 find . -name "*.h" -exec cp {} ~/Library/Developer/Xcode/UserData/CodeSnippets/ \;
grep 参数
r 遍历目录n 输出所在行c 输出数量v 反向匹配i 大小写不敏感A1 输出后面 1 行B1 输出前面一行 wf 输出两个文件相同的部分 grep -wf tmp11.txt tmp22.txt > tmp3.txt
cut 1 cat tmp.txt | cut -d '-' -f 2
或者直接使用 awk
1 cat tmp.txt | awk -F '-' '$2>100{print $0}'
-F 用 -符号切割$2 指第二列(从 1 开始数)$0 打印整行
awk grep 获取数字后, 求和 1 cat tmp.txt |grep 'End Stat Duration' | sed 's/^.*End Stat Duration //g' | awk '{sum += $1}; END {print sum}'
处理数字 1 2 » echo "0.12" | awk '{print $1 * 1000}' 120
sed 保存文件 必须要 sed -i "" $sed 命令 $文件
1 sed -i "" "s/$oldReg/$newWord/g" ${path}
插入行, 但是文字带特殊字符, 比如插入 import “XXX.h” 这一行到第 4 行, 就必须换行 1 2 3 4 5 6 fileName="XXX.h" lineNum=3 sed -i "" "${lineNum} a\\ #import \"$fileName\" " ${path}
精确匹配 一般 linux 上使用 \b 或者 \< 就好了, 但是 MacOS 必须必使用[[:<:]],
使用 gsed
1 2 $: echo "[SingerInfo class]" | gsed 's/\<SingerInfo\>/QRouterImpClassConformP(QMACSingerInfo)/g' [QRouterImpClassConformP(QMACSingerInfo) class]
使用sed
1 2 3 4 5 $: echo "[SingerInfo class]" | sed 's/\bSingerInfo/QRouterImpClassConformP(QMACSingerInfo)/g' [SingerInfo class] $: echo "[SingerInfo class]" | sed 's/[[:<:]]SingerInfo/QRouterImpClassConformP(QMACSingerInfo)/g' [QRouterImpClassConformP(QMACSingerInfo) class]
查询文件重复行数量 1 2 // 示例 cat 20221127_5.xlog | grep '\[2022-11-27' | sed 's/\[T.*\].*//g' | sed 's/^.*\]\[/\[/g' | sort | uniq -c | sort -n
1 2 // 实际做重复行查询的是这个 sort | uniq -c | sort -n
替换转义符 \ 有时候需要替换转义符, 比如把 \$ 换成 $
在命令行 使用#作为匹配的分隔符, 这样写
1 gsed -i 's#\\\\\$#\$#g' $file
写 shell 脚本 少两个转义符
1 2 ### change.sh gsed -i 's#\\\$#\$#g' $file
替换目录下所有文件的内容 比如 将 “_drafts” 目录下的 文件中的 “- Runloop” 换成 “- RunLoop”
1 grep 'Runloop' -rl _drafts | xargs gsed -i "s/\- Runloop/\- RunLoop/g"
一些常用命令的假名 1 2 3 4 5 6 7 8 9 10 11 12 13 14 // grep 美化 alias grep='grep --color=auto' // 查询进程信息 alias pg='ps aux | grep $1' // json 序列化 alias ppjson='python -m json.tool' // 当前文件夹 占用空间 alias ids='du -hd0' // 当前文件夹 每个文件/目录占用空间 alias idls='du -sh *' // 内网 IP alias iip='ifconfig | grep "inet " | grep -v 127.0.0.1 | grep -v 169.254 | cut -d\ -f2' // 外网 IP alias iipout='curl cip.cc'
SSH 主机设置 SSH 访问秘钥
1 2 3 4 5 6 7 8 9 10 11 # 切换到 git用户 su git sudo mkdir ~/.ssh # 创建.ssh/authorized_keys文件 # 这个文件是授权的主机信息 vim ~/.ssh/authorized_keys # 打开authorized_keys文件并将本地机器秘钥(~/.ssh/id_rsa.pub)复制的内容拷贝其中并保存 # 修改权限 chmod 700 ~/.ssh # 为.ssh文件夹赋予文件夹所有者可读可写可执行的权限 chmod 600 ~/.ssh/authorized_keys #为authorized\_keys文件赋予文件所有者可读可写的权限 # 本地主机输入如下命令 重新登录服务器,测试是否能不要密码登录到git用户 ssh git@server
为特定用户增加 ssh 访问 1 2 3 4 // 1. 获取本机的 id_rsa.pub cat ~/.ssh/id_rsa.pub // 2. 编辑服务器权限 sudo vim /home/{$user}/.ssh/authorized_keys
Mac 字典 字典下载http://download.huzheng.org/zh_CN/
安装命令
copy -rf build/xxx.dictionary ~/Library/Dictionaries
RVM - Fish Shell 执行 source /Users/wyan/.rvm/scripts/rvm 报错
1 source: Error while reading file '/Users/wyan/.rvm/scripts/rvm
在 bash/zsh 下正常安装 rvm 文档
1 2 3 gpg --keyserver hkp://pool.sks-keyservers.net --recv-keys 409B6B1796C275462A1703113804BB82D39DC0E3 7D2BAF1CF37B13E2069D6956105BD0E739499BDB \curl -sSL https://get.rvm.io | bash
对于 Fish Shell, 还有一步 见文档
1 2 3 curl -L --create-dirs -o ~/.config/fish/functions/rvm.fish https://raw.github.com/lunks/fish-nuggets/master/functions/rvm.fish echo "rvm default" >> ~/.config/fish/config.fish
Ruby 安装低版本 ruby 报错 查看错误日志如下
1 2 error: implicit declaration of function 'ffi_prep_closure' is invalid in C99 [-Werror,-Wimplicit-function-declaration] result = ffi_prep_closure(pcl, cif, callback, (void *)self);
解决方案如下
1 2 3 4 5 6 7 8 brew info libffi # 然后查看 LDFLAGS CPPFLAGS PKG_CONFIG_PATH 三个的值 export LDFLAGS="-L/opt/homebrew/opt/libffi/lib" export CPPFLAGS="-I/opt/homebrew/opt/libffi/include" export PKG_CONFIG_PATH="/opt/homebrew/opt/libffi/lib/pkgconfig" # 设置环境变量, 在安装低版本, 如 2.6.3 rvm install 2.6.3
Node - NVM - Fish Shell fish 下直接安装 nvm 会有问题, 使用 nvm.fish 安装
1 2 3 4 5 6 7 8 9 10 11 12 13 14 // 1. 安装fisher curl -sL https://raw.githubusercontent.com/jorgebucaran/fisher/main/functions/fisher.fish | source && fisher install jorgebucaran/fisher // 2. 安装 nvm.fish fisher install jorgebucaran/nvm.fish // 3. 查询 所有的 node 版本 nvm list-remote // 4. 安装最新版本 nvm install latest // 5. 安装某个版本 nvm install v12.12.0 // 6. 查看本机所有版本 nvm list // 7. 切换到某个版本 nvm use v12
编辑 config.fish 1 2 3 export NVM_DIR="$HOME/.nvm" // 设置默认版本 nvm use v21
iOS 开发 YYModel 1 2 3 4 5 6 7 8 9 10 11 12 13 14 15 16 17 18 19 20 21 22 #import <YYModel.h> + (NSDictionary *)modelCustomPropertyMapper { return @{ // propertyName 在左边 }; } + (NSDictionary *)modelContainerPropertyGenericClass { return @{ @"propertyName" : [XXXClass class], }; } - (BOOL)modelCustomTransformFromDictionary:(NSDictionary *)dic { // 自定义解析 return YES; }
关闭断言 1 pro handle SIGTRAP -s false
正片叠底效果 1 2 3 4 5 6 7 UIGraphicsBeginImageContextWithOptions(image.size, NO, image.scale); [backgroundColor setFill]; CGRect bounds = CGRectMake(0, 0, image.size.width, image.size.height); UIRectFill(bounds); [image drawInRect:bounds blendMode:kCGBlendModeMultiply alpha:0.3]; UIImage *newImage = UIGraphicsGetImageFromCurrentImageContext(); UIGraphicsEndImageContext();
Pod 静态库源码调试
删除这两个目录下 该静态库的文件夹1 2 DerivedData/QQMusic/Build/Intermediates.noindex/Pods.build/Debug-iphoneos DerivedData/QQMusic/Build/Products/Debug-iphoneos
重新编译 运行
快速添加代码运行时间 1 2 3 CFTimeInterval startTime = CACurrentMediaTime(); // 需要测试的代码 NSLog(@"Time: %lf", (CACurrentMediaTime() - startTime));startTime = CACurrentMediaTime();
dsym 定位信息 确认 dsym 和 ips 文件是否是一份
1 2 3 4 $ dwarfdump --uuid QQMusic.app.dSYM UUID: AC164D5D-BD8E-34F7-AC03-5741151CF6A5 (arm64) QQMusic.app.dSYM/Contents/Resources/DWARF/QQMusic
然后在 ips 下面的 image 列表找到如下:
1 2 Binary Images: 0x10085c000 - 0x109943fff QQMusic arm64 <ac164d5dbd8e34f7ac035741151cf6a5> /var/containers/Bundle/Application/2B7C7C47-2F46-4426-A147-8E9B817D2843/QQMusic.app/QQMusic
UUID 是对得上的
使用 atos 定位
1 atos -o QQMusic.app.dSYM/Contents/Resources/DWARF/QQMusic -arch arm64 -l ${加载地址} ${栈地址}
加载地址 是 ips 下面的 image 列表中的起始地址 0x10085c000栈地址 是崩溃堆栈中的地址
1 2 3 4 5 6 7 8 9 10 8 Foundation 0x000000022017d520 0x21ff47000 + 2319648 9 CoreLocation 0x000000022635fae8 0x22630c000 + 342760 10 CoreLocation 0x00000002263103b8 0x22630c000 + 17336 11 CoreLocation 0x0000000226319fec 0x22630c000 + 57324 12 QQMusic 0x00000001068cbe78 0x10085c000 + 101121656 13 QQMusic 0x00000001068c44c0 0x10085c000 + 101090496 14 QQMusic 0x00000001068c8718 0x10085c000 + 101107480 15 QQMusic 0x00000001068c8b28 0x10085c000 + 101108520 16 QQMusic 0x00000001068cb4f8 0x10085c000 + 101119224 17 QQMusic 0x00000001068cb44c 0x10085c000 + 101119052
找到栈顶的这个 0x00000001068cbe78 地址即可
1 atos -o QQMusic.app.dSYM/Contents/Resources/DWARF/QQMusic -arch arm64 -l 0x10085c000 0x00000001068cbe78
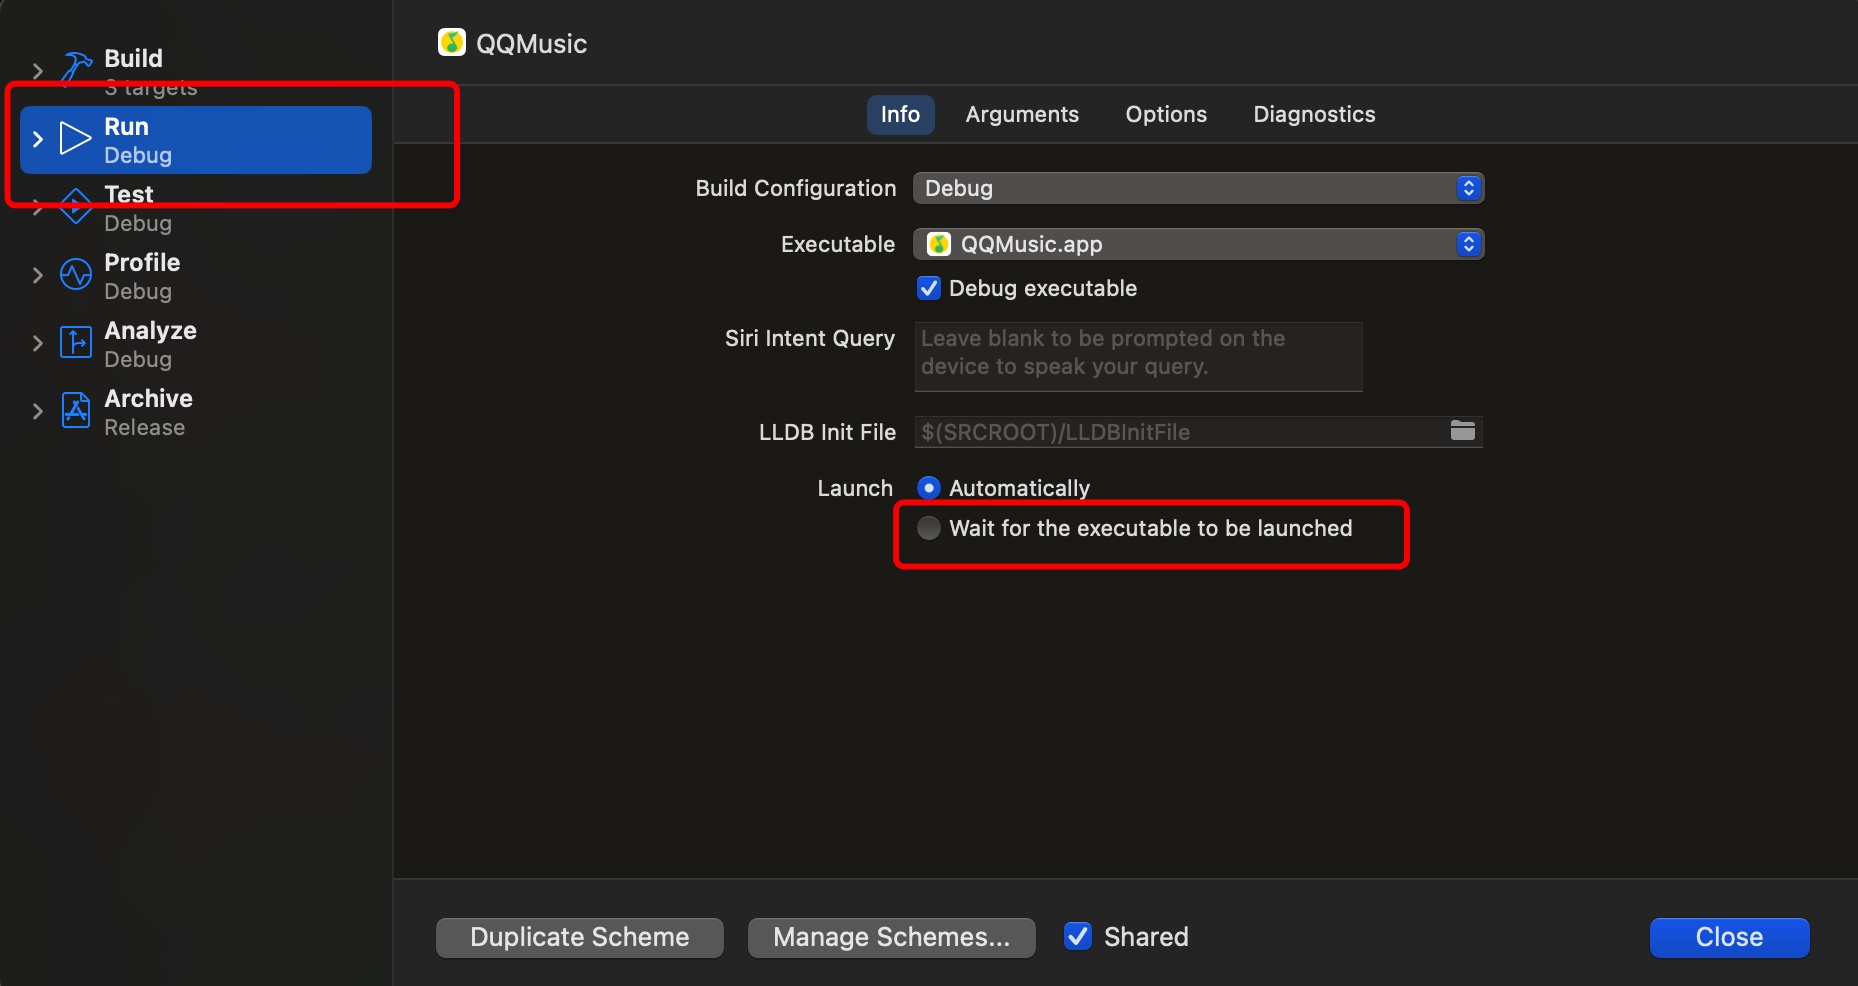
调试模式下 不启动 app
SQLite 索引 找到所有的索引 1 SELECT * FROM sqlite_master WHERE type='index';
创建索引 1 CREATE INDEX IF NOT EXISTS Index_Folder_Multi_NEWFOLDERS_1 ON NEWFOLDERS(uin,folderid,foldertype)
删除索引 1 DROP INDEX Index_Folder_Multi_NEWFOLDERS_1
是否使用索引 使用 EXPLAIN QUERY PLAN SELECT
1 EXPLAIN QUERY PLAN SELECT NEWFOLDERS.uin,NEWFOLDERS.folderid,NEWFOLDERS.foldertype,NEWFOLDERS.folderTid,NEWFOLDERS.seq FROM NEWFOLDERS WHERE uin=2400000010 AND folderid=201 AND foldertype=1
快速给手机配置 http 代理
手动点击收的设置->无线局域网->对应 wifi(Tencent-WiFi)->配置代理->手动填好
下载 shadowRocket, 右上角添加 Http 代理, 配置到 http 代理, 将 shadowRocket 的小组件加到手机负一屏即可
文件预处理 展开 1 通过 Product 按钮,依次点击Perform Action 、Preprocess “SunFrameB.m”
寻找 头文件展开ComHelper.h
1 2 3 4 5 6 # 12 "/Users/wyan/Develop/Code/WorkSpace/Classes/Foundation/Download/DownLoadTask.h" 2 # 1 "/Users/wyan/Develop/Code/WorkSpace/Classes/Util/ComHelper+Coupling.h" 1 # 1 "/Users/wyan/Develop/Code/WorkSpace/Classes/Util/ComHelper.h" 1 # 10 "/Users/wyan/Develop/Code/WorkSpace/Classes/Util/ComHelper.h"
说明是被 DownLoadTask.h 引进来的, 继续找第一个 DownLoadTask.h
1 2 3 4 5 6 7 8 #pragma clang module import Foundation /* clang -E: implicit import for #import <Foundation/Foundation.h> */ # 1 "/Users/wyan/Develop/Code/WorkSpace/Classes/Foundation/Download/ImageDownloadTask.h" 1 # 11 "/Users/wyan/Develop/Code/WorkSpace/Classes/Foundation/Download/ImageDownloadTask.h" #pragma clang module import Foundation /* clang -E: implicit import for #import <Foundation/Foundation.h> */ # 1 "/Users/wyan/Develop/Code/WorkSpace/Classes/Foundation/Download/HttpDownLoadTask.h" 1 # 1 "/Users/wyan/Develop/Code/WorkSpace/Classes/Foundation/Download/DownLoadTask.h" 1
继续找第一个 ImageDownloadTask.hImageManager.h ListBase.h CloudFolder.h UserSession.h SongInfo.h StatInfo.h, 最后这个 StatInfo.h 就是在 pch 里面的
即
StatInfo.hSongInfo.hUserSession.h CloudFolder.hListBase.hImageManager.hImageDownloadTask.hDownLoadTask.hComHelper.h
经过这样九层 import 才最终展开到 ComHelper.h 的头文件
服务器配置 Nginx 命令 查看nginx安装目录
查看nginx.conf配置文件目录
查看 Nginx 状态
1 sudo systemctl status nginx.service
遇到报错:
1 nginx: [emerg] mkdir() "/dev/shm/nginx-cache/wp" failed (2: No such file or directory)
手动添加新的二级域名 1 2 3 4 5 6 7 cd /etc/nginx/sites-available // 创建 新域名的配置, 这里只是简单 copy 其他配置, 自行按需配置就好 sudo cp demo.test.com rss.test.com // 修改配置, sudo sed -i 's/demo/rss/g' rss.test.com cd ../sites-enabled sudo ln -s /etc/nginx/sites-available/rss.test.com /etc/nginx/sites-enabled/
1 2 3 // 回到本地 上传证书 scp 1_rss.test.com_bundle.crt @name@{ip}://home/@name/download scp 2_rss.test.com.key @name@{ip}://home/@name/download
1 2 3 4 5 // ssh 到服务器 复制证书到 nginx 下 cd download sudo cp 1_rss.test.com_bundle.crt /etc/nginx/cert/ sudo cp 2_rss.test.com.key /etc/nginx/cert/ sudo systemctl restart nginx
最后需要在 域名解析 添加 记录
宝塔 重启宝塔
查看宝塔登录信息
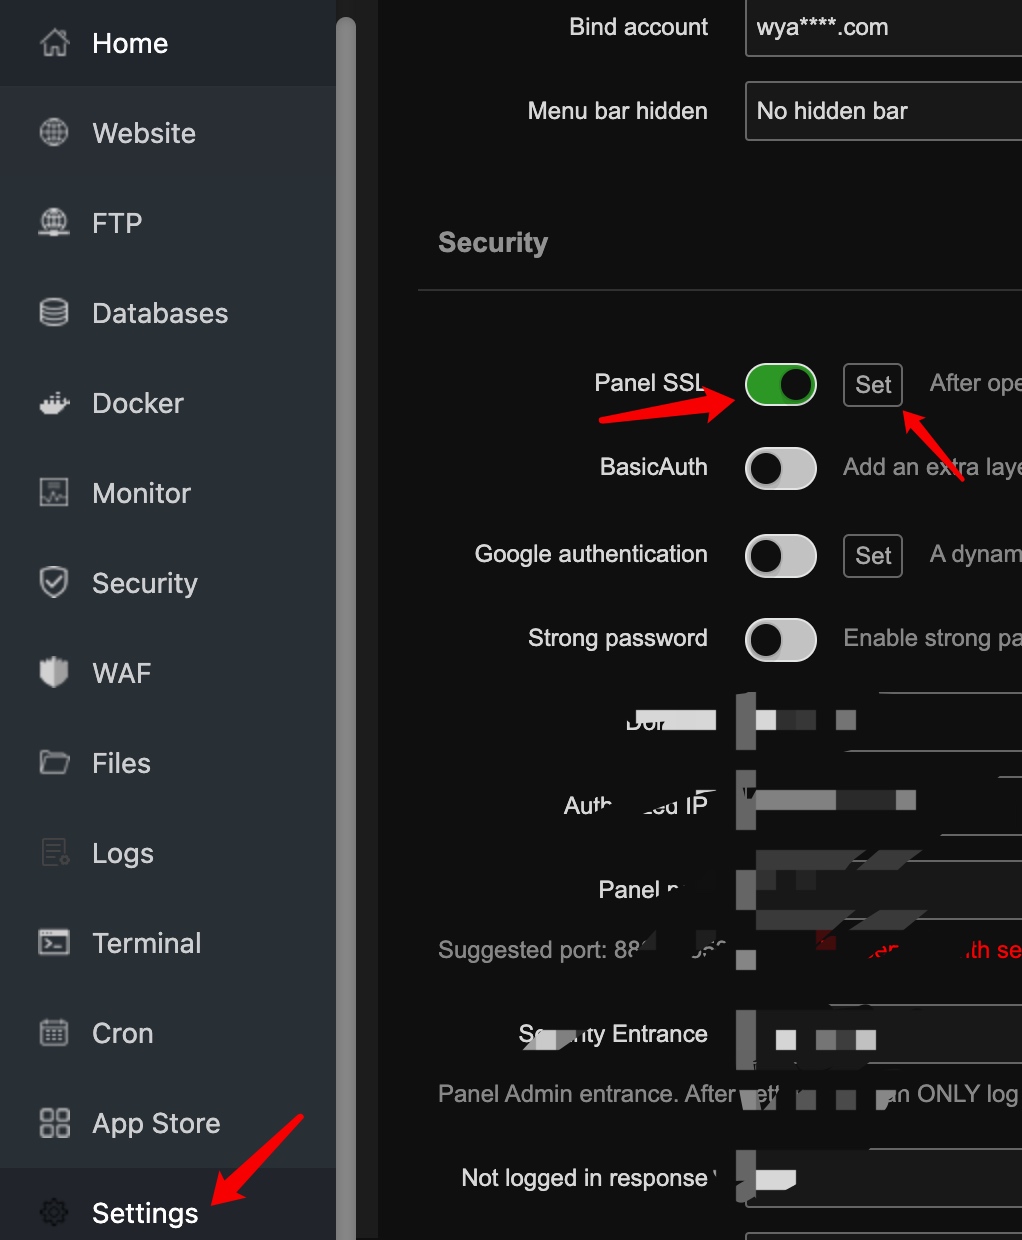
宝塔证书过期导致无法打开管理面板, 或者无法用 https 访问
1 2 // 使用 --ignore-certificate-errors --ignore-urlfetcher-cert-requests 参数打开 Chrome /Applications/Google\ Chrome.app/Contents/MacOS/Google\ Chrome --ignore-certificate-errors --ignore-urlfetcher-cert-requests &> /dev/null
然后在设置, 打开 ssl, 再在 Set 中复制下 ssl 的 key 以及 cert, 保存即可
安装 Bitwarder 错误 The container name “/xxx” is already in use by container 1 docker: Error response from daemon: Conflict. The container name "/vaultwarden" is already in use by container "403a4e8a55679454a374db00c722350a85a93b19b423e62ba2c1b837c3d0a945". You have to remove (or rename) that container to be able to reuse that name.
解决:
1 2 3 4 // 1 停止 container sudo docker container stop 403a4e8a55679454a374db00c722350a85a93b19b423e62ba2c1b837c3d0a945 // 2. 移除已经停止的容器 sudo docker container prune
Error starting userland proxy: listen tcp4 0.0.0.0:80: bind: address already in use docker 尝试使用 80 端口, 但是已经被 Nginx 占用了
1 2 3 4 $ sudo netstat -nlptu | grep 80 tcp 0 0 0.0.0.0:80 0.0.0.0:* LISTEN 10953/nginx: master tcp6 0 0 :::80 :::* LISTEN 10953/nginx: mast
解决办法:
然后配置 nginx 将二级域名转发到这个端口,
1 sudo docker run -d --name vaultwarden -v /bw-data/:/data/ -p 127.0.0.1:8443:80 vaultwarden/server:latest
安装 Bitwarden 命令 1 2 3 4 5 6 7 8 docker run -d --name bitwarden \ --restart unless-stopped \ -e ADMIN_TOKEN="randomkey" \ -e WEBSOCKET_ENABLED=true \ -v /www/wwwroot/bitwarden/:/data/ \ -p 6666:80 \ -p 3012:3012 \ vaultwarden/server:latest
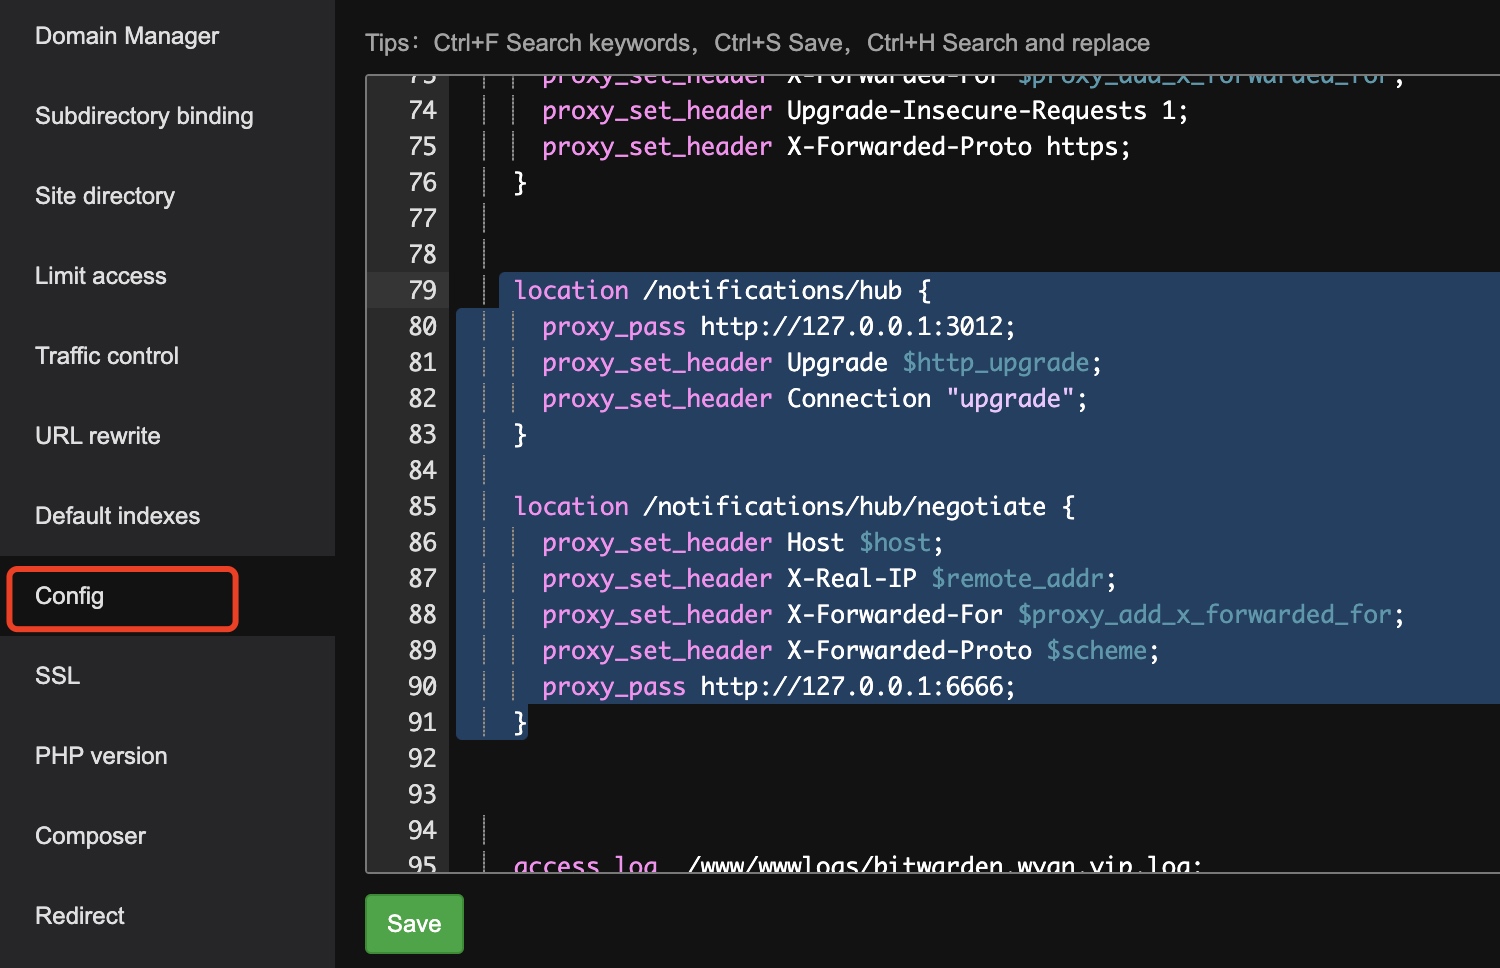
配置 反向代理
1 2 3 4 5 6 7 8 9 10 11 12 /// 6666 是设置的本机端口 location / { proxy_pass http://127.0.0.1:6666/; rewrite ^/(.*)$ /$1 break; proxy_redirect off; proxy_set_header Host $host; proxy_set_header X-Forwarded-Proto $scheme; proxy_set_header X-Real-IP $remote_addr; proxy_set_header X-Forwarded-For $proxy_add_x_forwarded_for; proxy_set_header Upgrade-Insecure-Requests 1; proxy_set_header X-Forwarded-Proto https; }
1 2 3 4 5 6 7 8 9 10 11 12 13 14 /// 其他配置 location /notifications/hub { proxy_pass http://127.0.0.1:3012; proxy_set_header Upgrade $http_upgrade; proxy_set_header Connection "upgrade"; } location /notifications/hub/negotiate { proxy_set_header Host $host; proxy_set_header X-Real-IP $remote_addr; proxy_set_header X-Forwarded-For $proxy_add_x_forwarded_for; proxy_set_header X-Forwarded-Proto $scheme; proxy_pass http://127.0.0.1:6666; }
hexo 部署 1 2 3 4 5 6 7 8 9 10 11 // 增加 git 用户, 设置密码 sudo adduser git // 增加权限 sudo vim /etc/sudoers #在root ALL=(ALL) ALL 下方添加一行 , wq 保存不了的话, 使用 wq! 覆盖 git ALL=(ALL) ALL // 退回权限 为了安全 // 为 git 添加访问的公钥 sudo mkdir /home/git/.ssh sudo vim /home/git/.ssh/authorized_keys // 粘贴本机的 ~/.ssh/id_rsa.pub
1 2 3 4 5 6 7 8 9 // 切户到 git sudo su git // /www/wwwroot/hexo 是存放静态网页的目录, 需要给 git 这个用户权限 cd /www/wwwroot sudo chmod go+w hexo // 创建git仓库, 用于存放 git-hook mkdir /home/git/repos cd /home/git/repos git init --bare hexo.git
1 2 3 4 5 6 7 // 配置钩子实现自动部署 cd /home/git/repos/hexo.git/hooks vim post-receive vim post-update // 输入下面两行, 第一行需要确认是 /bin/bash 还是 /bin/sh #!/bin/bash git --work-tree=/www/wwwroot/hexo --git-dir=/home/git/repos/hexo.git checkout -f
1 2 3 4 5 // 授权 cd /home/git/repos/hexo.git/hooks chmod +x post-receive #赋予其可执行权限 cd ../.. sudo chown -R git:git hexo.git #仓库所有者改为git
1 2 // 用户端使用git命令拉取, 测试仓库是否可用 git clone git@server_ip:/home/git/repos/hexo.git
1 2 3 4 5 6 7 8 9 10 11 12 13 14 15 // 配置hexo, 修改本地Hexo博客文件夹中的_config.yml文件 deploy: type: git repo: git@server_ip:/home/git/repos/hexo.git branch: master // 部署 hexo g hexo d // 部署完之后 确认最后几行没有诸如 "remote: fatal: cannot create director XXXX " 之类的错误, // 有的话就是 没有给 git 用户 /www/wwwroot/hexo 这个目录的权限, 看下上面有说明 // 或者是 /www/wwwroot/hexo 没有给 git 用户权限 // 此时检查 /www/wwwroot/hexo 有很多文件了 ls /www/wwwroot/hexo
再后面使用宝塔面板 或者 Nginx 配置 将域名指向 /www/wwwroot/hexo 即可访问
后续 deploy 到服务器遇到类似这样的错误 1 remote: error: unable to unlink old 'images/cc-by-nc-sa.svg': Permission denied
解决办法如下
1 2 // 登录服务器的 root 用户, 然后赋予 推送更新的 用户(git) 写权限 sudo chown -R git /www/wwwroot/hexo/
Shlink 重新生成 短连接服务的 APIkey
1 docker exec -it my_shlink shlink api-key:generate
url:
像下面这样, 更换浏览器需要重新输入
docker 1 2 3 4 5 6 7 8 9 10 11 12 13 14 15 16 17 18 19 20 21 22 23 24 25 26 27 28 29 30 // 查看Docker版本信息 docker version // 查看docker简要信息 docker -v // 关闭docker systemctl stop docker // 设置开机启动 systemctl enable docker // 设置 容器自动运行 --restart docker run -d \ --name shlink-web-client \ --restart unless-stopped \ -p 9990:80 \ shlinkio/shlink-web-client // 获取正在运行的容器列表 docker container list // 这个也可以 docker ps // 列出本机所有的容器(包括停止和运行) docker ps -a // 停止某个容器运行 docker container stop c581a28da715 // 重启容器 docker restart c581a28da715 // 移除的容器 docker container rm c581a28da715 // 移除所有已经停止的容器 docker container prune
NPM 查看npm源地址 临时使用 (淘宝源) 1 npm --registry https://registry.npm.taobao.org install express
持久使用 (淘宝源) 1 npm config set registry https://registry.npm.taobao.org
换回官方源 1 2 3 4 5 6 7 8 9 10 11 12 13 14 $ npm config set registry https://registry.npmjs.org/ /usr/local/lib ├── cloc@2.9.0 ├── express-generator@4.16.1 ├── hexo-cli@4.3.1 ├── hexo-site@0.0.0 -> ./../../../Users/wyan/Develop/git/hexo ├── n@9.2.0 ├── nodemon@2.0.7 ├── npm-check-updates@16.14.6 ├── npm-check@6.0.1 ├── npm-upgrade@3.1.0 ├── npm@10.2.0 ├── whistle.vase@1.3.1 └── whistle@2.5.17
卸载特定包 1 $ npm uninstall -g "@tencent/whistle4qqmusic"
查看全局包 VSCode 搜索不含用某个字符串的行 比如 搜索不含有 “dcl” 的行
Doc to markdown 安装 pandoc 以及 gsed (GNU 的 sed, Mac 自带的总有些小问题)
1 2 brew install pandoc brew install gnu-sed
然后复制以下脚本 doc2md.sh:
1 2 3 4 5 6 7 8 9 10 11 12 13 14 15 16 17 18 19 20 21 22 23 24 25 26 27 28 29 30 31 32 33 34 35 36 37 38 which pandoc > /dev/nullrc=$? if [[ $rc != 0 ]]; then echo "FATAL missing pandoc. You can install with 'brew install pandoc' or similar" exit 9 fi if [ -z "$1 " ]; then echo "Usage:" echo "" echo " docx2md.sh [filename-no-extension]" exit 13 fi if [ ! -f "$1 .docx" ]; then echo "FATAL missing file '$1 .docx'" exit 11 fi mkdir -p "$1 /media/$1 " cd "$1 " pandoc -f docx -t markdown --extract-media="media/$1 " -o "$1 .md" "../$1 .docx" sed -i "" "s/^>//g" "$1 .md" gsed -i 's#\\\$#\$#g' "$1 .md" gsed -i "s#\\\'#\'#g" "$1 .md" gsed -i 's#\\\[#\[#g' "$1 .md" gsed -i 's#\\\]#\]#g' "$1 .md" gsed -i 's#\\\.#\.#g' "$1 .md" gsed -i 's#\\\"#\"#g' "$1 .md" gsed -i 's#\\\-#\-#g' "$1 .md" gsed -i 's#\\\*#\*#g' "$1 .md" gsed -i 's#\\\~#\~#g' "$1 .md" gsed -i 's#\\\\#\\#g' "$1 .md" gsed -i 's#\\>#>#g' "$1 .md" gsed -i 's#\\<#<#g' "$1 .md"
假设文件是 “特效.docx”
会在目录下生成对应的文件以及图片资源
Hexo 能力 隐藏更多 图片控制大小 并居中 1 2 3 4 <p align="center"> <img src="https://cdn.qiniu.wyan.vip/mweb/2023-05-16849002866696.png" alt="居中" width='50%' height='50%'/> </p>
效果:
图片添加题注 1 2 3 4 5 6 7 8 9 10 11 <center> <p align="center"> <img src="https://cdn.qiniu.wyan.vip/mweb/2023-05-16849002866696.png" alt="居中" width='50%' height='50%'/> <br> <div style="color:orange; border-bottom: 1px solid #d9d9d9; display: inline-block; color: #999; padding: 2px;">这里输入题注</div> </p> </center>
这里输入题注