参考链接 Kuikly - 组件
Pager为Kuikly页面的入口类,类似iOS UI中的VC, Pager也有类似VC的生命周期:
1 2 3 4 5 6 7 8 9 10 11 12 13 14 15 16 17 18 19 20 21 22 23 override fun created () super .created() } override fun pageDidAppear () super .pageDidAppear() } override fun pageDidDisappear () super .pageDidDisappear() } override fun pageWillDestroy () super .pageWillDestroy() }
一个常见的Page 1 2 3 4 5 6 7 8 9 10 11 12 13 14 15 16 17 18 19 20 21 22 23 24 25 26 27 28 29 30 31 32 33 34 35 36 37 38 @Page("my_ctstom_name" ) internal class MyCustomPage : BasePager () { companion object { private const val TAG = "MyCustomPageTag" } var currentName by observable("" ) override fun build () val ctx = this return { attr { backgroundColor(Color.WHITE) } View { } } } override fun createPlugins () val plugins = HashMap<String, () -> PluginModule>().apply { putAll(super .createPlugins()) hashMapOf( MediaPlugin.PLUGIN_NAME to { MediaPlugin() } ).let { putAll(it) } } return plugins + BizPluginBuilderList.getSomePlugin() } }
VM 1 2 3 4 5 6 7 8 9 10 11 12 13 14 15 16 17 18 19 20 21 22 23 24 25 26 27 28 29 30 31 32 33 34 35 36 37 38 39 40 41 42 43 44 45 46 47 48 @Page("my_ctstom_name" ) internal class MyCustomPage : BasePageStatePager () { companion object { private const val TAG = "MyCustomPage" } val viewModel: MyCustomModel by lazy { getViewModel(MyCustomModel::class ) } override fun created () super .created() KLog.i(TAG, "created" ) viewModel.acquirePageData() } override fun buildWhenSuccess () val ctx = this KLog.i(TAG, "buildWhenSuccess" ) return { attr { flexDirectionColumn() } View { attr { size(pagerData.pageViewWidth, pagerData.pageViewHeight) backgroundColor(Color.BLUE) } } } } override fun onErrorStateClick () override fun onEmptyStateClick () override fun onNoNetStateClick () override fun bizType () null override fun getPageStateViewModel () out BasePageStatePager> = viewModel override fun createPlugins () return super .createPlugins() + BizPluginBuilderList.getBubble() } }
VM 继承 BasePageStateViewModel 1 2 3 4 5 6 7 8 9 10 11 12 13 14 15 16 17 18 19 20 21 internal class MyCustomModel : BasePageStateViewModel <MyCustomPage >() { companion object { private const val TAG = "MyCustomModel" } fun acquirePageData () KLog.i(TAG, "acquirePageData" ) setTimeout(200 ) { KLog.i(TAG, "markSuccess" ) markSuccess() } } } fun createViewModel (modelClass: KClass <out BaseViewModel <out BasePager >>) out BasePager>? { return when (modelClass) { MyCustomPageModel::class -> MyCustomPageModel() } }
数据刷新 by observable 变量被设置为 by observable 后, UI 绑定这个变量会直接变化
1 2 3 4 5 6 7 var isOpen by observable(false )Switch { attr { isOn(ctx.isOpen) } }
vbind 组件使用vbind包裹,当vbind内属性发生改变时,整个组件会重新绘制
1 2 3 4 5 6 7 8 9 10 11 vbind({ ctx.displaySomething }) { if ( xx ) { View { } } else if ( xx ) { View { } } }
vfor 对于数量可变的列表数据,使用vfor包裹来实现cell,列表变化时会重新绘制
1 2 3 4 5 6 7 vfor({ ctx.dataList }) { itemData -> PersonInfoCustomizeCell { attr { item = itemData } } }
vif 1 2 3 4 5 6 7 8 9 10 11 12 13 14 15 vif({ xxx }) { View { } } velseif({ }) { View { } } velse { View { } }
ComposeView 1 2 3 4 5 class CustomView : ComposeView <} internal fun ViewContainer<*, *> .Custom (init : CustomView .() -> Unit ) addChild(CustomView(), init ) }
外部设置值 1 2 3 4 5 6 7 8 9 10 11 12 13 14 15 16 17 18 19 20 21 22 23 24 25 26 27 28 29 30 31 32 33 class CustomView : ComposeView <CustomViewAttr >() { override fun body () val ctx = this val bottomArrowX = ctx.attr.bottomArrowX } override fun createAttr () return CustomViewAttr() } } internal class CustomViewAttr : ComposeAttr () { var bottomArrowX = 0f } class OtherClassView : ComposeView () { override fun body () val ctx = this View { Custom { attr { bottomArrowX = showX } } } } }
事件处理 1 2 3 4 5 6 7 8 9 10 11 12 13 14 15 16 17 18 19 20 21 22 23 24 25 26 27 28 29 30 31 32 33 34 35 36 class CustomView : ComposeView <CustomViewEvent >() { override fun body () val ctx = this View { event { click { KLog.i(TAG, "onSendClick" ) ctx.event.onSendClick?.invoke(ctx.attr.customViewParam) } } } } } class CustomViewEvent : ComposeEvent () { var onSendClick: ((CustomViewParam) -> Unit )? = null } class OtherClassView : ComposeView () { override fun body () val ctx = this View { Custom { event { onSendClick = { customViewParam -> } } } } } }
布局 布局属性
Flex 布局 flexDirection 主轴
flexDirectionColumn(默认): 主轴方向为竖直方向,子孩子从上往下布局
flexDirectionRow: 主轴方向为水平方向,子孩子从左往右布局
flexDirectionColumnReverse: 主轴方向为竖直方向,子孩子从下往上布局
flexDirectionRowReverse: 主轴方向为水平方向,子孩子从右往左布局
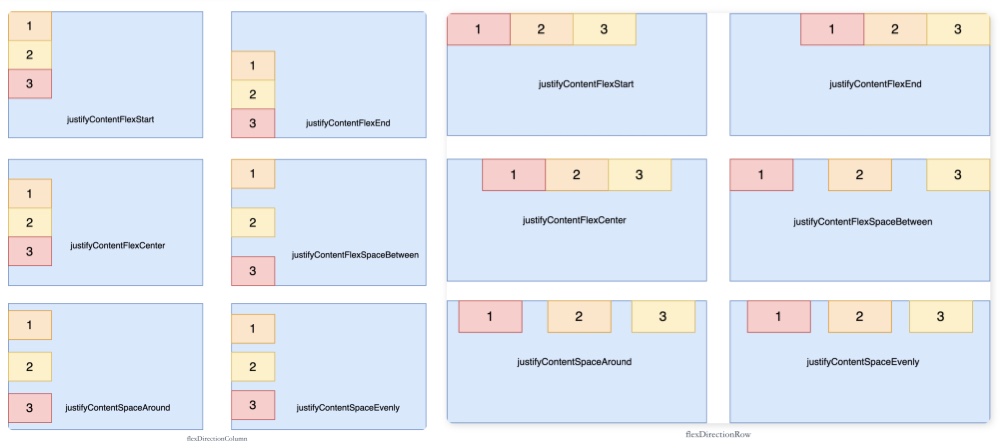
justifyContent 主轴分布模式
justifyContentFlexStart(默认): 主轴开始的位置进行对齐
justifyContentFlexEnd: 主轴结束的位置进行对齐
justifyContentCenter: 主轴的中间位置进行对齐
justifyContentSpaceBetween: 主轴两端对齐,子孩子之间的间隔都相等
justifyContentSpaceAround: 每个项目两侧的间隔相等。所以,子孩子之间的间隔比项目与边框的间隔大一倍
justifyContentSpaceEvenly: Flex Item之间的间距相等,包括与边缘位置的距离
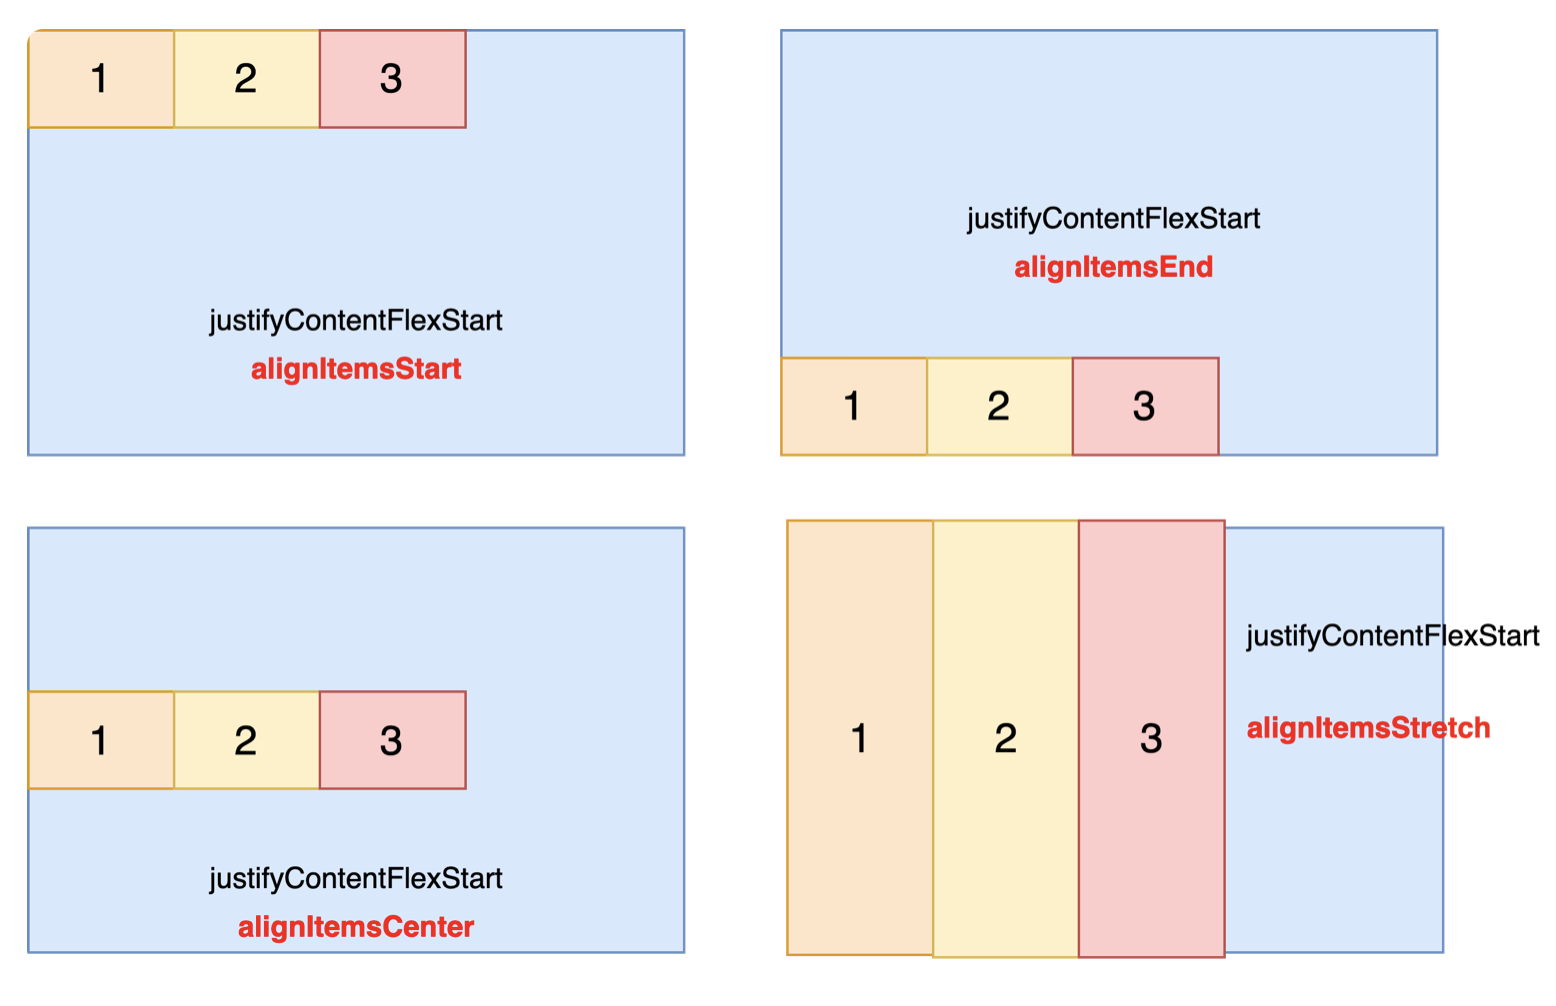
alignItems 交叉轴
alignItemsFlexStart: 交叉轴的起点对齐
alignItemsFlexEnd: 交叉轴的终点位置对齐
alignItemsCenter: 交叉轴的中点位置对齐
alignItemsStretch(默认): 如果 Flex 容器的孩子没有指定大小(高度或者宽度,取决于交叉轴是水平还是竖直)的话,将占满 Flex 容器
当 flexDirection 为 flexDirectionRow 时,交叉轴的方向为竖直方向,此时 alignItems 各个属性的效果为
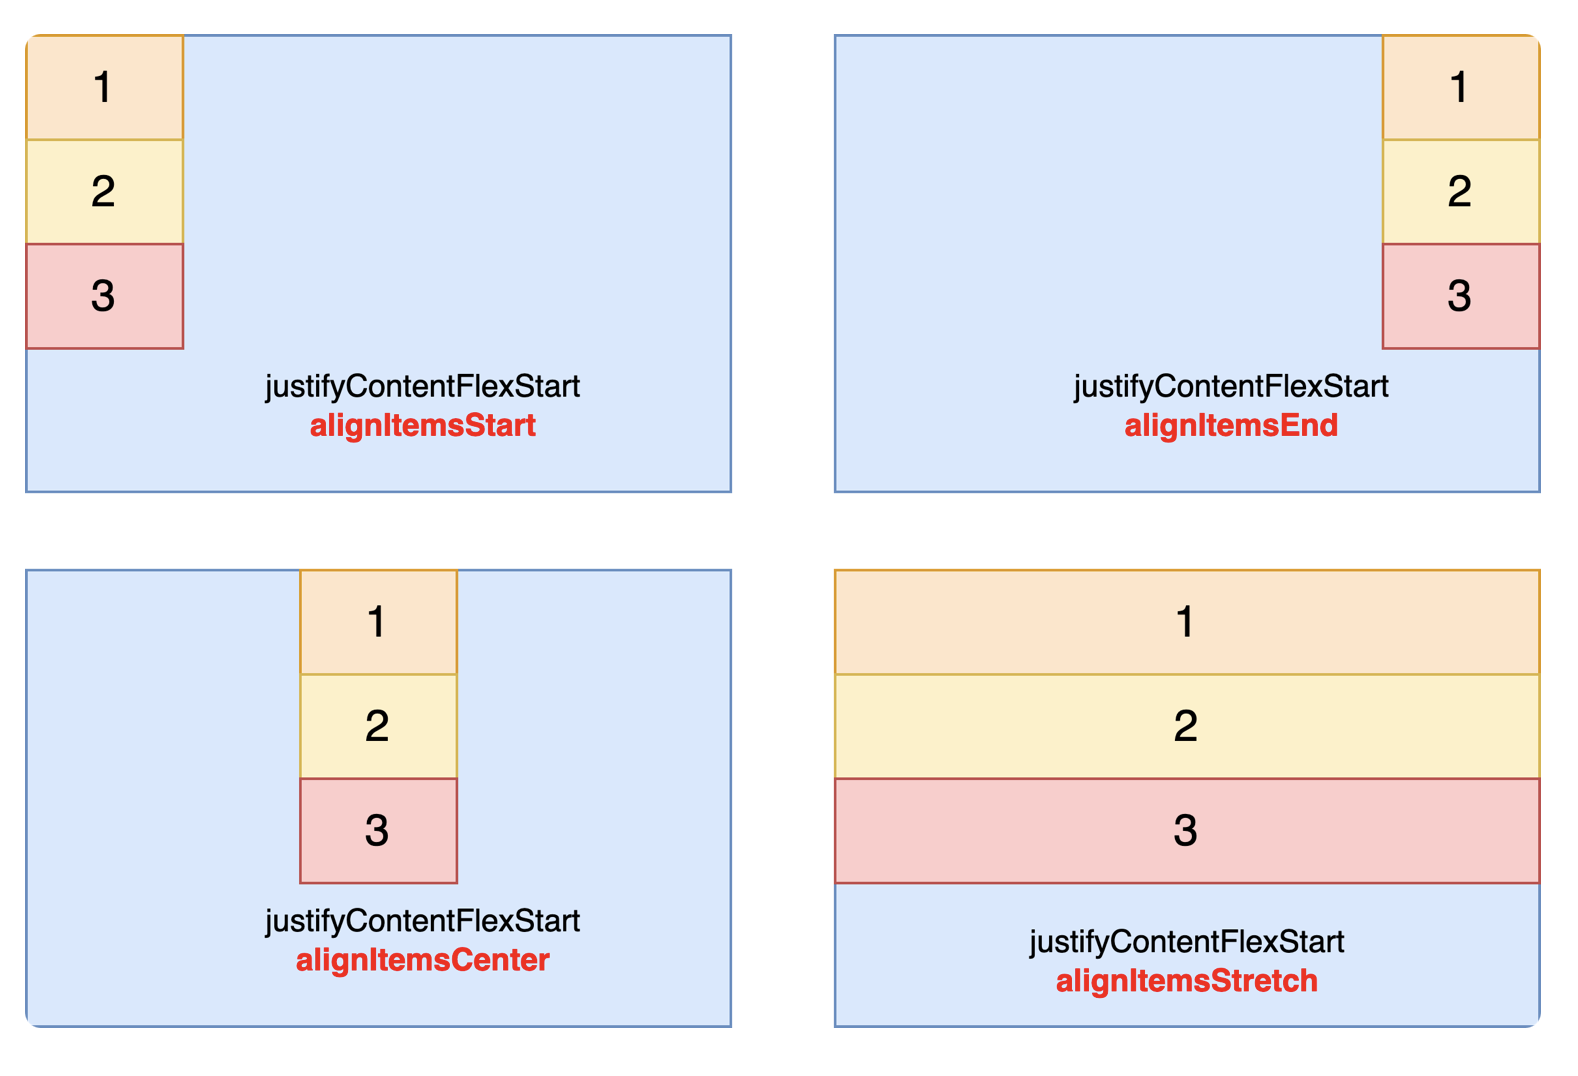
当 flexDirection 为 flexDirectionColumn 时,交叉轴的方向为水平方向,此时 alignItems 的各个属性效果为:
Flex Item 布局属性 上面讲述的 Flex Container 属性,是针对 Flex Container 下的所有孩子生效。Flex Item 也可自己设置布局属性,覆盖 Flex Container 的属性。
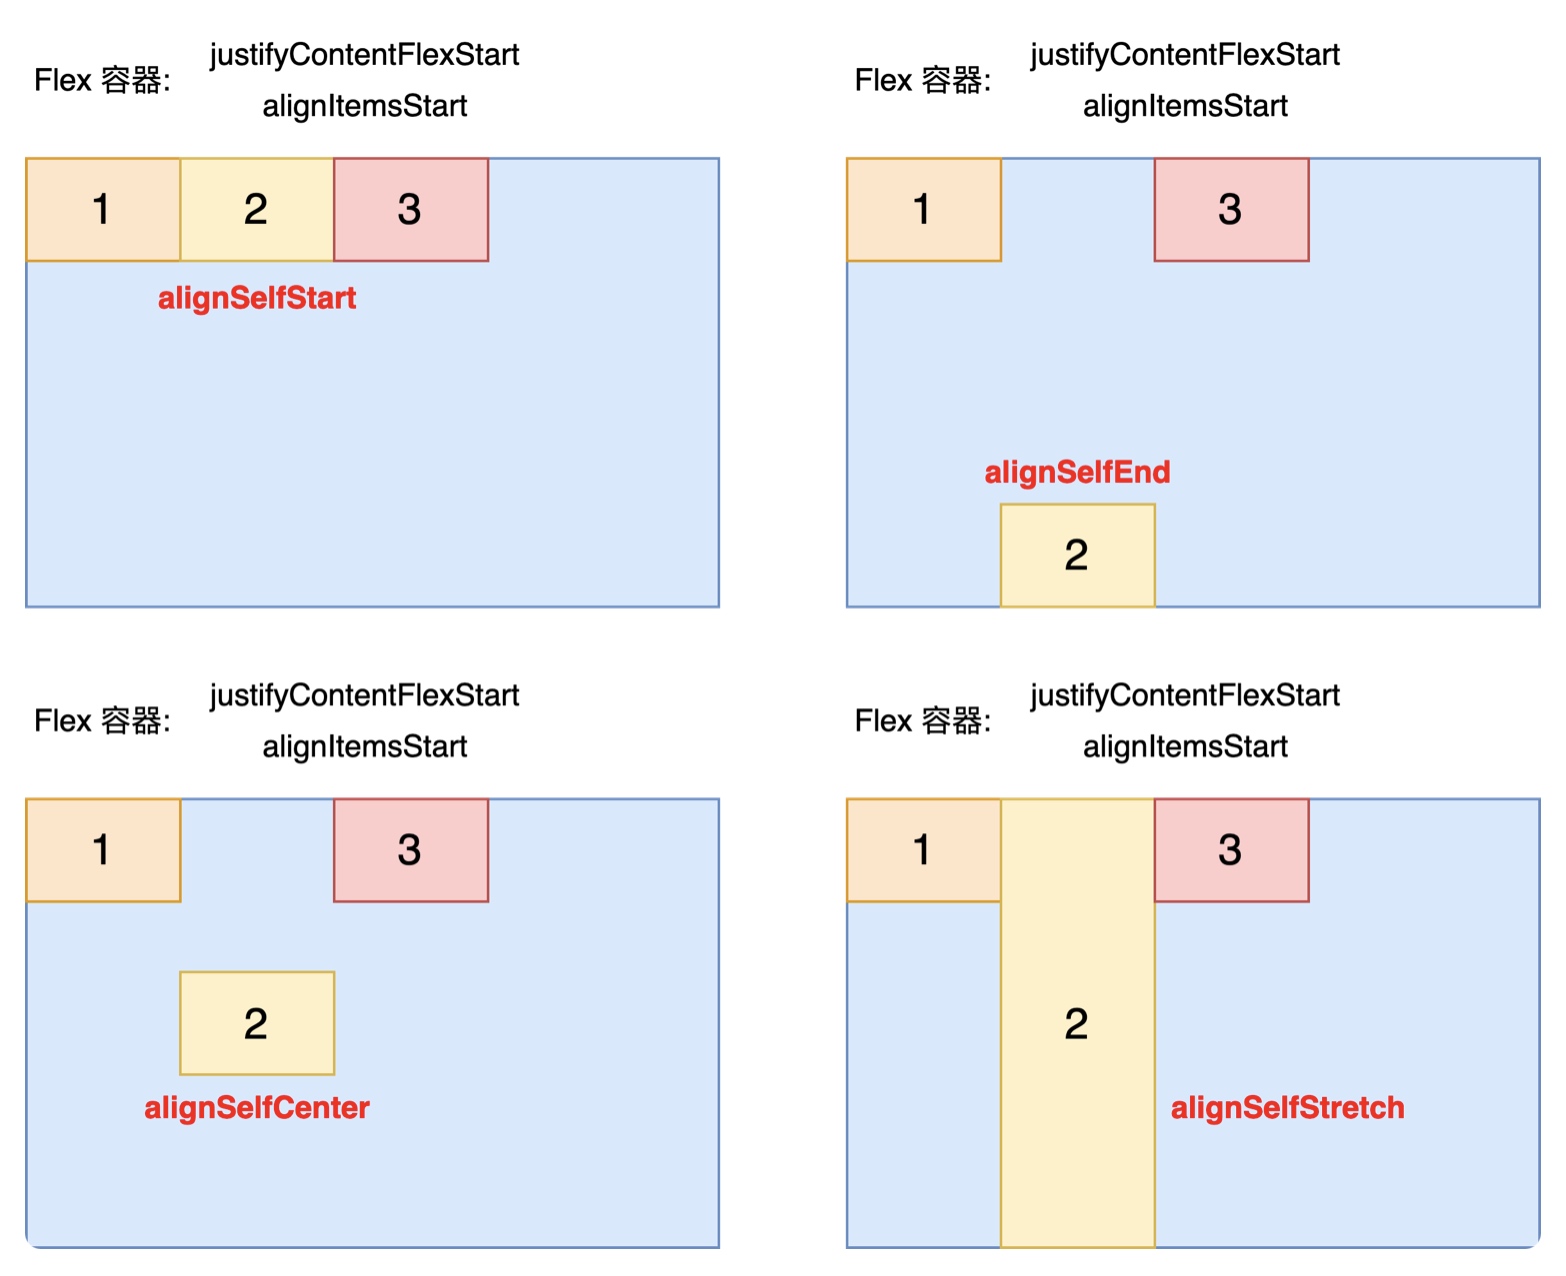
alignSelf alignSelf属性是控制Flex Item自身在 Flex 容器的交叉轴上的对齐方式,会覆盖 Flex 容器指定的 alignItems 属性,可选值为:
alignSelfFlexStart: Flex Item 自身在 Flex 容器的交叉轴的起点对齐
alignSelfCenter: Flex Item 自身在 Flex 容器的交叉轴中点对齐
alignSelfFlexEnd: Flex Item 自身在 Flex 容器的交叉轴终点对齐
alignItemsStretch: Flex Item 自身在交叉轴方向上铺满Flex 容器
alignSelf 与 alignItems 差不多,具体的对齐方向与 flexDirection 的值有关
当 flexDirection 的值为 flexDirectionColumn 时,Flex Item 设置 alignSelf 的效果如下:
flex Flex Item 在主轴上,占据 Flex 容器的剩余可用空间的比例。 可用空间是指 Flex 容器除去已经被占用的空间,剩下的空间大小, 比如: 顶部是一个 titlebar,剩下的空间分配给列表
1 2 3 4 5 6 7 8 9 10 11 12 13 14 15 16 17 18 19 20 21 22 23 View { attr { size(screenWidth, screenHeight) flexDirectionColumn() } View { attr { height(56f ) } } List { attr { flex(1f ) } } }
绝对布局 与 superView 一样大 1 2 3 4 5 View { attr { absolutePositionAllZero() } }
保持间距 1 2 3 4 5 6 7 8 9 10 11 12 13 14 15 16 17 View { attr { size(screenWidth, screenHeight) } Image { attr { positionAbsolute() top(0f ) bottom(0f ) right(0f ) left(0f ) } } }
常用UI组件 设置背景色/圆角 1 2 3 4 attr { backgroundColor(ctx.buildThemedColor("skin_floor_color" )) borderRadius(10f ) }
文本 1 2 3 4 5 6 7 8 9 10 Text { attr { fontSize(36f .pxw) fontWeight500() marginTop(40f .pxw) marginBottom(10f .pxw) text(itemData.title) color(ctx.buildThemedColor("skin_text_main_color" )) } }
按钮 1 2 3 4 5 6 7 8 9 10 11 12 13 14 15 16 17 18 19 20 21 22 Button { attr { size(80f , 40f ) borderRadius(20f ) marginLeft(2f ) marginRight(15f ) backgroundLinearGradient( Direction.TO_BOTTOM, ColorStop(Color(0xAA23D3FD ), 0f ), ColorStop(Color(0xAAAD37FE ), 1f ) ) titleAttr { text(JUMP_TEXT) fontSize(17f ) color(Color.WHITE) } } click(Clickable.nill()) { } }
加载图片 1 2 3 4 5 6 7 Image { attr { src("https://musicx.y.qq.com/kuikly/assets/ic_svip_quality_guide_check.png" ) size(DESIGN_DESC_ICON_SIZE.pxh(), DESIGN_DESC_ICON_SIZE.pxh()) marginRight(DESIGN_DESC_ICON_MARGIN_RIGHT.pxh()) } }
1 2 3 4 5 6 7 8 9 10 const val MORE_ICON_PATH = "bubble/common/bubble_function_more.png" Image { attr { size(songIconWH, songIconWH) src("https://y.qq.com/music/photo_new/T011M000004FTa8N17qFpb.png" ) } }
列表 1 2 3 4 5 6 7 8 9 10 11 12 13 14 15 16 17 18 19 20 21 22 23 24 25 26 27 28 29 30 31 List { attr { positionAbsolute() } vfor({ ctx.dataList }) { itemData -> View { attr { Size(pagerWidth, 40F ) flexDirectionRow() } Image { attr { size(30F , 30F ) src(itemData.avatarUrl) } } Text { attr { fontSize(36f .pxw) fontWeight500() marginTop(40f .pxw) marginBottom(10f .pxw) text(itemData.title) color(ctx.buildThemedColor("skin_text_main_color" )) } } } } }
列表 cell 高度设置(在 cell 设置) 1 2 3 4 5 6 7 8 9 10 11 12 13 14 15 16 17 18 19 20 21 22 23 24 25 26 27 28 29 30 31 32 33 34 35 36 37 38 List { ref { ctx.listViewRef = it } attr { absolutePositionAllZero() } vfor({ ctx.dataList }) { itemData -> PersonInfoCustomizeCell { attr { item = itemData } } } } override fun body () val ctx = this return { attr { height(120F ) } View { attr { backgroundColor(Color.WHITE) borderRadius(10F ) positionAbsolute() top(0F ) left(20F ) right(20F ) bottom(10F ) flexDirectionRow() } } } }
列表调用方法 1 2 3 4 5 6 7 8 9 10 11 12 13 14 15 16 17 18 19 20 21 22 23 24 25 26 import com.tencent.kuikly.core.views.ListViewinternal class xxxPager : BasePager () { var listViewRef : ViewRef<ListView<*, *>>? = null override fun build () val ctx = this return { List { ref { ctx.listViewRef = it } attr { absolutePositionAllZero() } } } } override fun viewDidLayout () super .viewDidLayout() this .listViewRef?.view?.setContentInset(top = 500F ) this .listViewRef?.view?.setContentOffset(0F , -500F ) } }
subView 回调 1 2 3 4 5 6 7 8 var pager = getPager()if (pager is SomePager){ pager.isShowAutoTranslateWarningDialog = true }
弹窗 1 2 3 4 5 6 7 8 9 10 11 12 13 14 15 16 17 18 19 20 21 22 23 24 25 26 27 28 29 30 31 32 33 34 35 36 37 var isShowAutoTranslateWarningDialog by observable(false )return { View { ctx.buildAutoTanslateWarningDialog().invoke(this ); } } private fun buildAutoTanslateWarningDialog () val ctx = this return { SendMsgWarningDialog { attr { showDialog = ctx.isShowAutoTranslateWarningDialog title = StringConst.AUTOTRANSLATE_DIALOG_TITLE content = StringConst.AUTOTRANSLATE_DIALOG_CONTENT } event { onButtonSureClick = { ctx.isShowAutoTranslateWarningDialog = false KLog.i(TAG, "[clickedTranslateBtnForAlert] click sure " ) } onButtonCancelClick = { ctx.isShowAutoTranslateWarningDialog = false KLog.i(TAG, "[clickedTranslateBtnForAlert] click cancel " ) } } } } } this .isShowAutoTranslateWarningDialog = true
ViewBuilder 直接返回一个方法体
1 2 3 4 5 6 7 8 9 10 11 12 13 14 15 16 17 18 19 override fun build () val ctx = this return { ctx.cutOffLineViews().invoke(this ) } } private fun cutOffLineViews () return { View { attr { backgroundColor(Color(0xffEBEBEB )) height(1f ) margin(40f ) } } } }
跟肤 直接跟肤的字段
1 color(ctx.buildThemedColor("skin_text_main_color" ))
不能直接用的 这样处理
1 2 3 4 5 6 7 8 9 10 11 12 13 14 15 16 17 18 19 20 21 22 23 24 25 26 27 28 29 30 31 32 33 34 35 36 37 38 39 40 41 42 43 44 45 46 47 48 49 50 51 var cardSubTitleColor by observable(Color.BLACK.withAlpha(0.5f ))override fun created () super .created() getThemeColor() (getPager() as BasePager).let { page -> page.nativeEvent?.on(EVENT_THEME_STATE_CHANGE) page.registerNativeEventListener(this ) } } override fun viewDestroyed () super .viewDestroyed() (getPager() as BasePager).let { page -> page.unregisterNativeEventListener(this ) page.nativeEvent?.off(EVENT_THEME_STATE_CHANGE) } } private fun getThemeColor () KLog.i(TAG, "[getThemeColor] start" ) val scheme = QMSchemeUtil.buildScheme( module = "theme" , method = "getThemeColors" , params = JSONObject() ) Bridge.getPlugin<UIPlugin>(UIPlugin.PLUGIN_NAME)?.apply { openNative(OpenUrlInfo.createSchemeInfo(scheme)) { res -> KLog.i(TAG, "[getThemeColor] getThemeColors, result= $res " ) val skinMainTextColorStr = res?.optJSONObject("data" )?.optString("skin_text_main_color" ) KLog.i(TAG, "[getThemeColor] getThemeColors, skinMainTextColorStr= $skinMainTextColorStr " ) if (skinMainTextColorStr != null ) { val color = ColorTransformer.fromRGBAStr(skinMainTextColorStr).buildColor() val pushBtnBgColor = color.withAlpha(0.5f ) cardSubTitleColor = pushBtnBgColor } } } } override fun onNativeEvent (event: String , data : JSONObject ?) super .onNativeEvent(event, data ) when (event) { EVENT_THEME_STATE_CHANGE -> { KLog.i(TAG, "theme change" ) getThemeColor() } else -> {} } }
图片染色(tintColor), 需要用 vbind 包一下, 不然不会跟着变化(by observable 失效了)
1 2 3 4 5 6 7 8 9 10 11 vbind({ ctx.viewModel.cardIconColor }) { Image { attr { absolutePositionAllZero() tintColor(ctx.viewModel.cardSubTitleColor) src(getPager().getResPath(DEFAULT_ALBUM_PATH)) tintColor(ctx.viewModel.cardIconColor) resizeCover() } } }
KuiklyView size 变化通知 Native
Kuikly 侧页面调用 1 2 3 4 5 6 7 8 9 View { attr {} event { layoutFrameDidChange { ctx.sendContentSizeChangeEvent(it) } }
胶水层 (统一处理, 业务不用处理) 监听 content_size_did_changed 通知 1 2 3 4 5 6 7 8 9 10 11 12 13 14 15 16 17 18 19 20 21 22 23 24 25 26 27 28 29 30 31 32 33 34 35 36 37 38 -(void )onReceiveContentSizeChanged:(NSNotification *)notification { NSString *thisUUID = _routerInfo.extraInfo.uuid; NSDictionary *info = notification.userInfo; if (info[@"container_uuid" ] && [info[@"container_uuid" ] isKindOfClass:[NSString class ]]) { NSString *eventContainerUUID = [info objectForKey:@"container_uuid" ]; if (thisUUID && eventContainerUUID && ![thisUUID isEqualToString:eventContainerUUID]) { return ; } } NSString *pageName = @"" ; if (info[@"pageName" ] && [info[@"pageName" ] isKindOfClass:[NSString class ]]) { pageName = [info objectForKey:@"pageName" ]; } CGFloat contentWidth = -1 ; if (info[@"width" ] && [info[@"width" ] isKindOfClass:[NSNumber class ]]) { contentWidth = [info[@"width" ] floatValue]; } CGFloat contentHeight = -1 ; if (info[@"height" ] && [info[@"height" ] isKindOfClass:[NSNumber class ]]) { contentHeight = [info[@"height" ] floatValue]; } KuiklyLog(TAG, @"[onReceiveContentSizeChanged] pageName: %@, width: %f, height: %f" , pageName, contentWidth, contentHeight); CGRect newFrame = self .frame; newFrame.size.height = contentHeight; newFrame.size.width = contentWidth; [super setFrame:newFrame]; CGRect newKuiklyFrame = self .kuiklyDelegator.renderView.frame; newKuiklyFrame.size.height = contentHeight; newKuiklyFrame.size.width = contentWidth; [self .kuiklyDelegator.renderView setFrame:newKuiklyFrame]; }
业务 监听 content_size_did_changed 通知 1 2 3 4 5 6 7 8 9 10 11 12 -(void )onReceiveContentSizeChanged:(NSNotification *)notification { NSDictionary *info = notification.userInfo; NSString *notiUUID = [JsonHelper getStringFromDictionary:info forKey:@"container_uuid" isBase64Format:NO withDefault:@"" ]; NSString *curUUID = kuiklyContentView.routerInfo.extraInfo.uuid; PersonalInfoLog(@"Kuikly view size 更新 %@, %@, %d, height: %.1f" , notiUUID, curUUID, kuiklyContentView == nil , kuiklyContentView.height); if (curUUID.length > 0 && [curUUID isEqualToString:AVOID_NIL_STRING (notiUUID)]) { if (kuiklyContentView) { } }
逻辑 日志 1 2 3 4 5 KLog.i( TAG, "[onMessageBodyLongPress] msgFrame=$msgFrame , msgBodyFrame=$msgBodyFrame , clickX=$clickX , clickY=$clickY , msgBodyLeft=$msgBodyLeft , messageModel=$messageModel " ) KLog.i(TAG, "created artist_enc_uin: fromOne ${fromOne} fromTwo ${fromTwo} " )
缓存 1 bubblePlugin?.read(key = KEY_HAVE_DISPLAYED_GUIDE_VIEW + userId + myOwnEncryptUin)
判空(null 执行 toInt() 会崩溃) 1 !clickCountBefore.isNullOrEmpty()
类型转换 1 2 3 4 var clickTs = clickTsBefore?.toLongOrNull() ?: 0L val tsStr = clickTs.toString()
延时处理 获取时间戳 1 var ts = DateTime.currentTimestamp();
枚举 1 2 3 4 5 6 internal enum class MediaType { PHOTO, CAMERA, VIDEO, VOICE }
字符串兜底值 1 2 3 4 var fromOne = pagerData.getParamString("artist_enc_uin" ) ?: "" var fromTwo = pagerData.getExtrasParamString("artist_enc_uin" ) ?: "" var from = fromOne.ifEmpty { fromTwo }
通知 1 2 3 4 5 6 7 8 9 10 11 12 notifyModule.addNotify("xx" ) { it?.getString("xx" )?.let { returnName -> } } notifyModule.postNotify("xx" , JSONObject().apply { put("xx" , "value" ) })
页面跳转 1 2 3 4 5 6 7 8 9 10 11 12 13 14 15 16 17 18 19 20 21 22 fun openPage (page: String , jsonObject: JSONObject ? = null , mode: Int = TABBAR_DISPLAY_HIDE_ALL, statusLight : Boolean = true , extras: JSONObject ? = null ) Bridge.getPlugin<UIPlugin>(UIPlugin.PLUGIN_NAME)?.apply { openKuikly(KuiklyRouterInfo().apply { router = KuiklyRouterInfo.ROUTER_OPEN_QMPAGE pageName = page params = jsonObject container = Container().apply { tabbarMode = mode this .statusLight = statusLight } pExtras = extras }) } } openPage("my_ctstom_name" , JSONObject().apply { put("uin" , uin) put("XX" , xx) })
调用 Native 的 scheme 1 2 3 4 5 6 7 8 uiPlugin?.openNative( module = "ui" , method = "xxxMethod" , params = JSONObject().apply { put("color" , 1 ) } )
数组 1 2 3 4 5 6 7 8 9 10 11 12 13 14 15 16 17 18 19 listOf("*.jar" , "*.aar" ) val topImages = mutableListOf<DressDialogTopImage>()topImages.add(topImage) val array = intArrayOf(1 , 2 , 3 , 4 , 5 )for (element in array) { println(element) } val array = intArrayOf(1 , 2 , 3 , 4 , 5 )for (index in array.indices) { println("Index: $index , Value: ${array[index]} " ) }
哈希表 1 2 3 4 5 6 7 8 9 10 11 12 13 14 15 16 17 mapOf("h" to h, "m" to m, "s" to s) val data = mutableMapOf()data ["" ] = "" val map = mapOf("a" to 1 , "b" to 2 , "c" to 3 )map.forEach { (key, value) -> println("Key: $key , Value: $value " ) } val map = mapOf("a" to 1 , "b" to 2 , "c" to 3 )for (key in map.keys) { println("Key: $key " ) }
通知 1 2 3 4 5 6 7 8 9 10 11 12 13 14 15 16 internal class xxxPager : BasePager () { private lateinit var eventCallbackRef: CallbackRef override fun created () super .created() eventCallbackRef = acquireModule<NotifyModule>(NotifyModule.MODULE_NAME).addNotify("xxx" ) { } } override fun pageWillDestroy () super .pageWillDestroy() acquireModule<NotifyModule>(NotifyModule.MODULE_NAME).removeNotify("xxx" , eventCallbackRef) } }
事件通知 event on/off 1 2 3 4 5 6 7 8 9 10 11 12 13 14 15 16 17 18 19 20 21 22 23 24 25 26 27 28 29 30 31 32 33 internal class xxxView : ComposeView (), BasePager.NativeEventListener { override fun created () super .created() KLog.i(TAG, "created" ) (getPager() as BasePager).let { page -> page.nativeEvent?.on(EVENT_ENTER_BACKGROUND) page.registerNativeEventListener(this ) } } override fun viewDestroyed () super .viewDestroyed() KLog.i(TAG, "viewDestroyed" ) (getPager() as BasePager).let { page -> page.unregisterNativeEventListener(this ) page.nativeEvent?.off(EVENT_ENTER_BACKGROUND) } } override fun onNativeEvent (event: String , data : JSONObject ?) super .onNativeEvent(event, data ) if (EVENT_ENTER_BACKGROUND == event) { KLog.i(TAG, "enter bg" ) } } }
如果是 BasePager
1
2
3
4
5
6
7
8
9
10
11
12
13
14
15
16
17
18
19
20
21
internal class xxxPager : BasePager () { override fun created () super .created() nativeEvent?.initCallback(this ) nativeEvent?.on(EVENT_PLAY_STATE_CHANGED) } override fun viewDestroyed () super .viewDestroyed() nativeEvent?.off(EVENT_PLAY_STATE_CHANGED) } override fun onNativeEvent (event: String , data : JSONObject ?) super .onNativeEvent(event, data ) val innerData = data ?.optJSONObject("data" ) innerData?.let { if (event == EVENT_PLAY_STATE_CHANGED) { } } } }
Scheme 调用 普通调用 scheme
1 (getPager() as ? BasePager)?.uiPlugin?.openScheme(OpenUrlInfo(moreScheme))
比如 media.DelObserverPlayerState
1 2 3 4 5 6 7 8 9 10 11 12 13 14 15 16 internal class DelObserverPlayerState ( params: JSONObject ) : MediaScheme(DEL_OBSERVER_PLAYER_STATE, params) { internal class Builder : QMScheme.Builder () { override fun build () return DelObserverPlayerState(params) } fun initParams ( userID: String ) params.put("userId" , userID) return this } } }
调用:
1 2 3 4 5 val delObserverScheme = DelObserverPlayerState.Builder().initParams(userId).build().scheme()GetModuleHelper.uiPlugin()?.openNative(delObserverScheme, callback = { data -> })
上面的 openNative 可以换成openNativeKeepAlive, 达到多次回回调目的(iOS 如下支持, Android 不支持, 两端保持一致 可以用 event on)
1 2 3 4 5 6 7 - (void )handle_media_delObserverPlayerState:(NSDictionary *)params callback:(NSString *)callback { QQJSWebViewCallback cb = [self .webViewController popCallBack:callback]; }
Kuikly 注册调用 (支持多次调用) 1 2 3 4 5 6 7 8 9 10 11 12 13 14 15 16 17 18 internal class BubblePlugin : CompatPluginModule () { override fun pluginName () return "xxx_plugin" } fun callSchemexxx (param1: String , callback: (objReturn : Boolean , objReturn1 : String ) -> Unit ) toNative(true , pluginMethod("xxxselector" ), JSONObject().apply { put(PARAM_1, param1) }.toString(), { data -> data ?.let { val objReturn = it.optString("objReturn" ) val objReturn1 = it.optString("objReturn1" ) callback.invoke(objReturn == "1" , objReturn1) } }, false ) } }
Native 实现:
1 2 3 4 5 6 7 REGISTER_BRIDGE_PLUGIN(@"xxx_plugin" , @"xxxselector" ); - (void )xxxselector:(NSDictionary *)params callback:(KuiklyRenderCallback)callback { }